Ascent Passport
- Central Caucasus, Mizhirgi gorge, 2.5. From Kittlod pass to Gezivcek pass (from the north from the Main Caucasian Ridge).
- Name of the peak: Misses-Tau, name of the route through the center of the Eastern wall.
- Proposed — 6A category of difficulty, second ascent.
- Nature of the route: combined
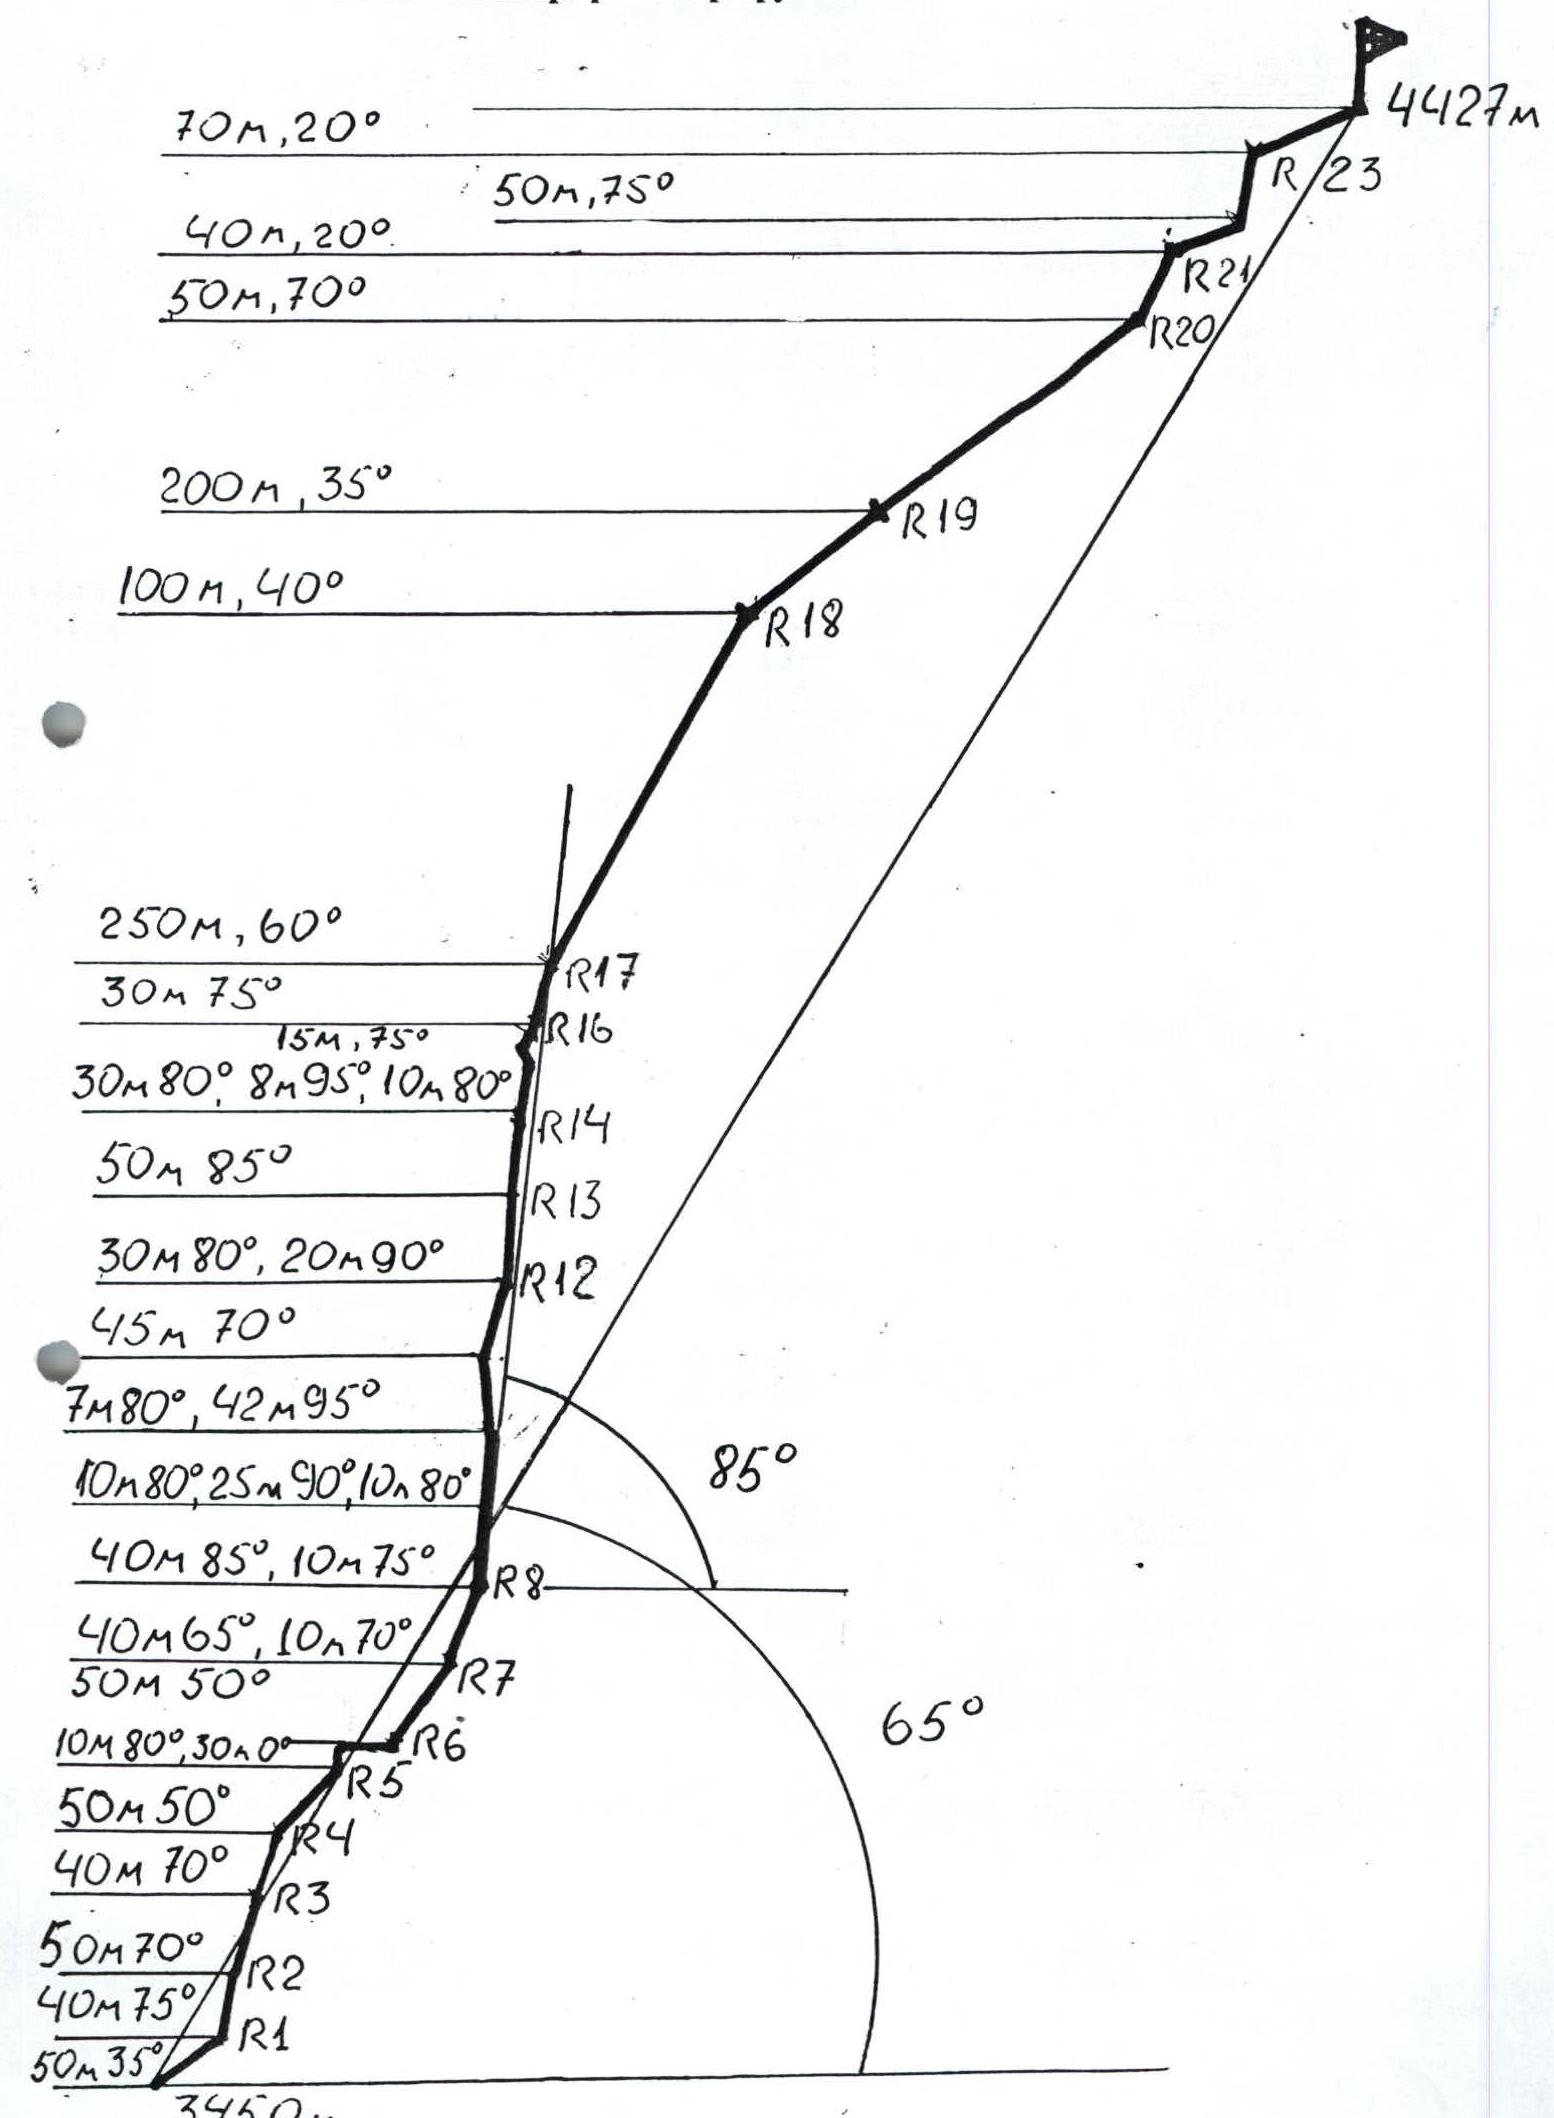
- Height difference of the route: 980 m (by altimeter)
Route length: 1492 m. Length of sections:
- V category of difficulty — 295 m.
- VI category of difficulty — 165 m.
Average steepness:
- main part of the route — 85°
- entire route — 65°
- "Hooks" left on the route: total 9; including bolted 0
Hooks used on the route:
- bolted stationary — 20 (including Aid Climbing — 2)
- bolted removable — 0 (including Aid Climbing — 0)
Used:
- rock hooks — 45 (including Aid Climbing — 12)
- chocks — 158 (including Aid Climbing — 50). Total artificial points of support (Aid Climbing) used — 64
- Team's travel hours: 66 h, 8 days
- Leader: Nikitin Andrey Borisovich, Candidate Master of Sports
Participants:
- Izotov Albert Olegovich, 1st sports category
- Molodozhen Vladimir Alexandrovich, Candidate Master of Sports
- Coach: Nikitin Andrey Borisovich, Candidate Master of Sports
- Departure on the route: 8:00, July 9, 2006
Reached the summit: 12:15, July 17, 2006. Returned to Base Camp: 21:20, July 17, 2006
General photo of the summit
Misses-Tau, 4477 m
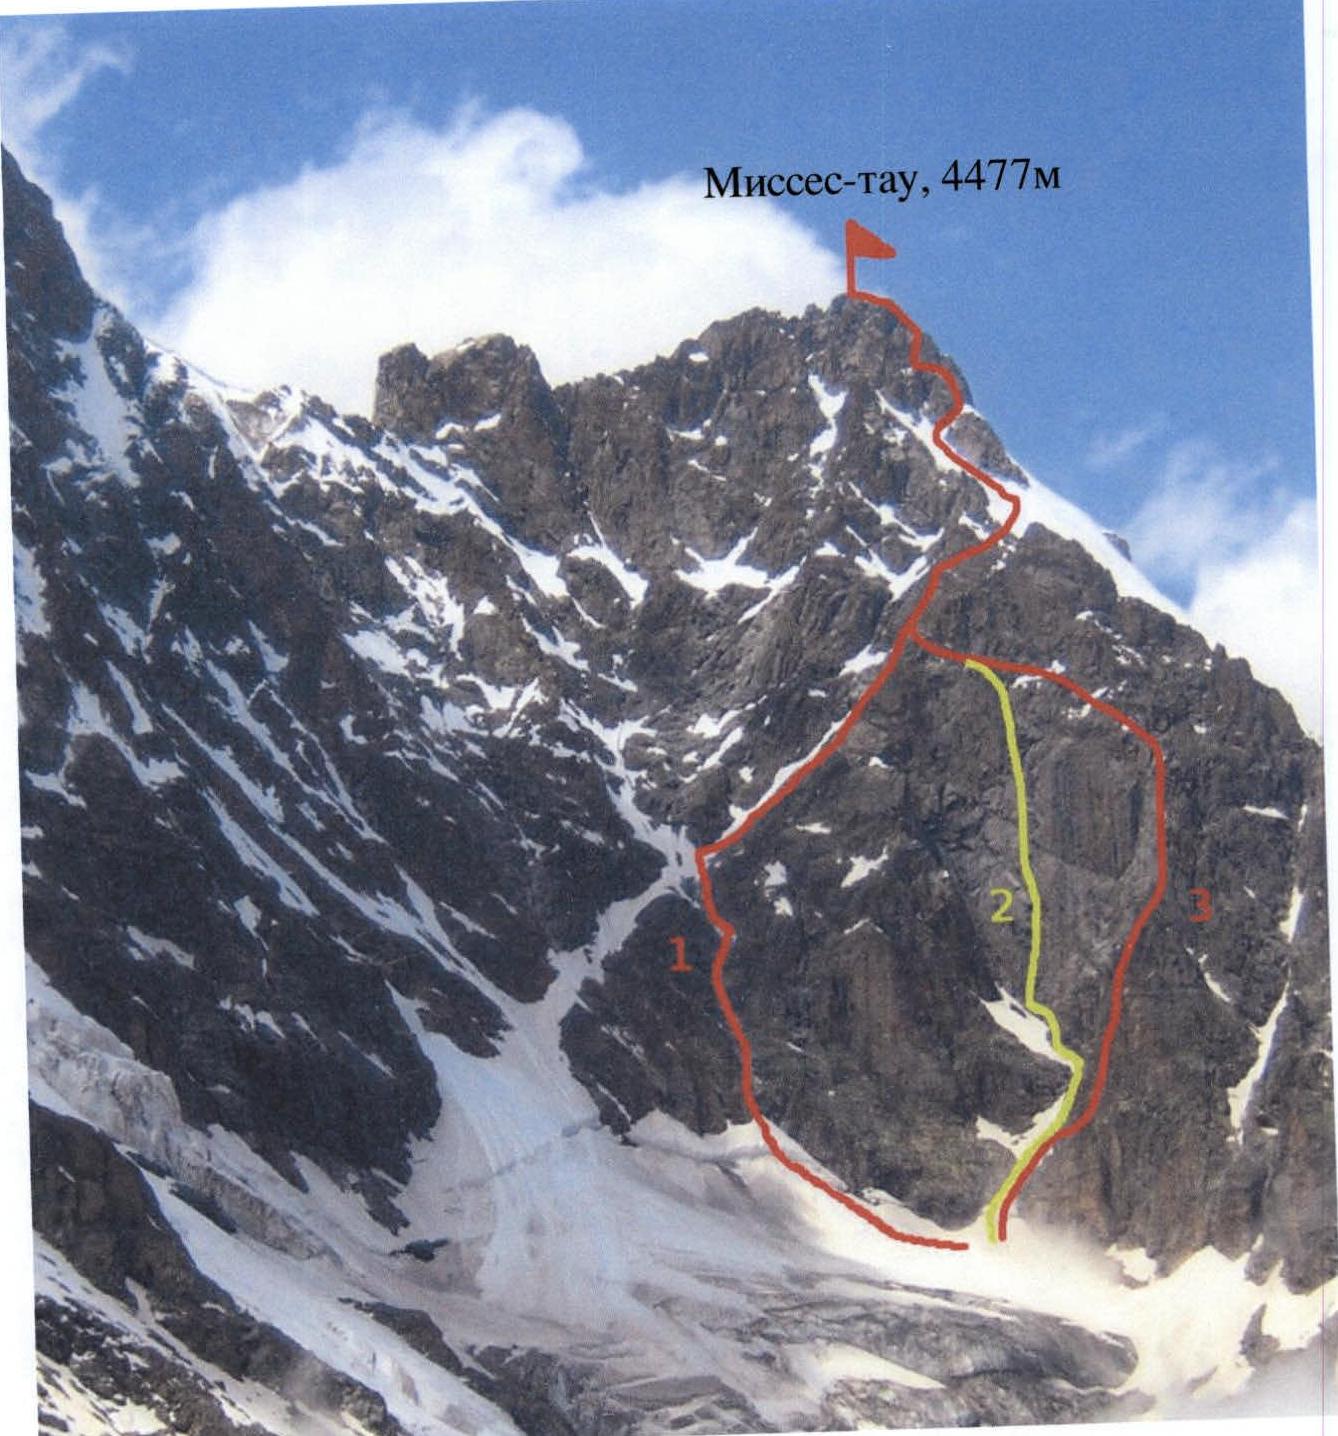
- via E wall, 5A
- through the center of E wall (our route)
- via right-hand couloir of E wall, 5B
Hand-drawn profile of the route
 Dykh-Tau, 5204 m

Route diagram in UIAA symbols (scale 1:2000)
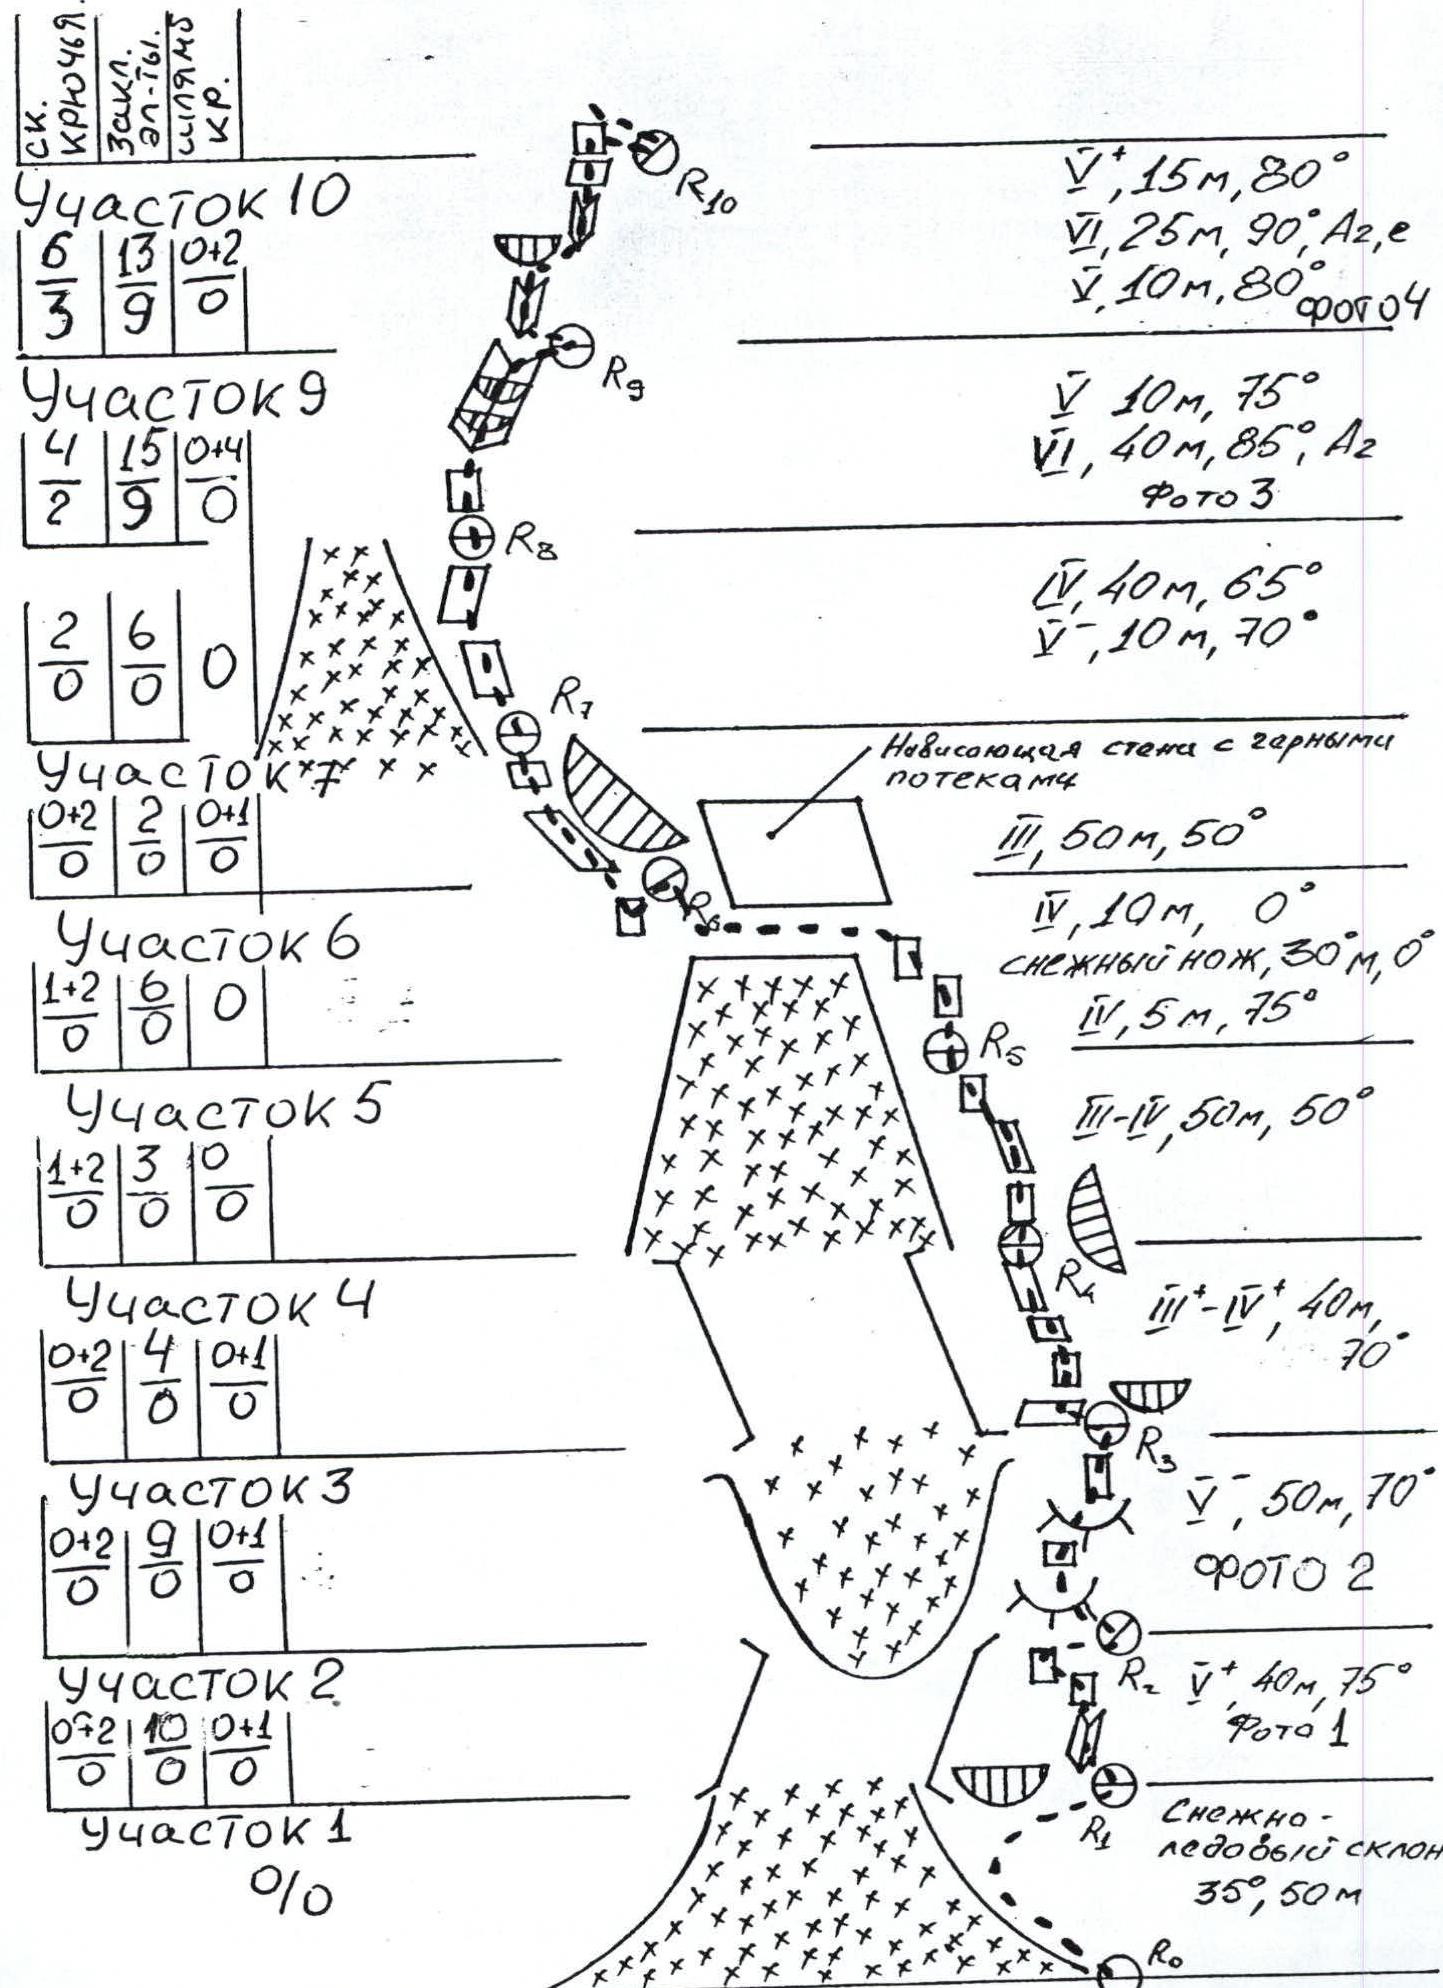
Route description
Approach to the wall via a snow-ice slope, approximately 35°. Start — on the right rib, before entering the cirque of the wall itself with a large cornice in the middle part.
R1–R2
Straight up from the snowpatch, on monolithic rocks of V–VI category (6A). Start from the bergschrund.
If there's a lot of snow:
- the first section can be bypassed via snow
- approach via a bridge almost to R2
Bivouac — 2 hooks + bolt, tied with an old loop of a main rope. Section is about 75–80°.
R2–R3
Straight up from the bivouac, via destroyed rocks of V category. To the left remains a couloir, partially with snow, exposed to rockfall from above.
Bivouac — 2 hooks + bolt.
Section is 70–75°.
R3–R4
From the bivouac upwards via destroyed rocks, partially overgrown with grass, orienting towards an overhanging rock block.
Approximately 25–30 m — a duralumin bolt.
Further, "on foot" to the overhanging block.
Bivouac — 2 channel irons.
Rocks are III–IV category, slope 60–70°.
R4–R5
Leftwards via a traverse along a scree ledge, then upwards via destroyed rocks, approximately IV category. Bivouac — 2 hooks, average slope 50–60°.
R5–R6
Leftwards upwards, via destroyed rocks of IV–V category, about 70°. We approach closely to the upper part of the snowpatch, which we previously bypassed along the cirque walls. Bivouac — in a pocket between the main wall and a standalone block, directly above the "knife" of the upper part of the snowpatch, hook + channel iron + chock.
R6–R7
Leftwards along the "knife", above a hanging glacier and under an overhanging rock with a black streak — 0°, at the end of the "knife" on the wall of the hanging glacier — a bolt, further leftwards upwards, initially via very destroyed wet rocks, then via the hanging glacier of the next snowpatch. Bivouac — 2 hooks in the hanging glacier.
R7–R8
Initially leftwards upwards via the hanging glacier, then straight upwards via rocks of V category, 70°, to a large ledge with several blocks on it. Bivouac — two hooks at the base of the blocks.
Beginning of the wall
R8–R9
To the left (approximately 5–6 m) of the large ledge, deep in the hanging glacier, 2 bolts left by the first ascendants. To the left of them, a system of small ledges, via which we ascend straight upwards via climbing, gradually moving rightwards, finding ourselves almost above the large ledge. 10 m, V category, 75–80°.
Further, 40 m upwards via an inside corner, rocks of VI category, 85–90°. Climbing is 6C+–7B or A2. Equipment:
- Small and medium chocks
- Skyhooks
- Hooks
- Cams
Bivouac — on a ledge about 30 cm wide, 2 bolts + hook + cam, deeply lodged in a crack.
R9–R10
Straight up via an inside corner of V–VI category, protection — hexes and cams. Further, two inside corners diverge with overgrown, blind cracks at the base.
Bivouac is located 40 m higher up the left inside corner. Due to unclear description, we moved via the right — VI category, Aid Climbing A2–A3, full set of gear. In the upper part, already in direct visibility of the bivouac, we transitioned leftwards via slabs.
Bivouac — 2 bolts.
R10–R11
From the bivouac leftwards upwards in the direction of large cornices, 7 m of IV category. Orient towards the right cornice (left is black, right is light). Further, 20 m of challenging climbing under the cornice — VI category or 6B–6C — then Aid Climbing A2 through the cornice upwards.
The section can be climbed via free climbing (6B–6C), but belay opportunities are limited.
Above the cornice — a bolt, and leftwards via simple rocks about 5 m to the bivouac.
Bivouac — 2 bolts.
R11–R12
From the bivouac leftwards upwards via simple (IV–V category) rocks. Many large "live" blocks, clear danger of rope damage. Exit onto a large ledge with a control cairn, possible overnight stay on the ledge. The ledge is located above a huge cornice in the middle part of the wall, visible from almost all points.
Bivouac — two bolts.
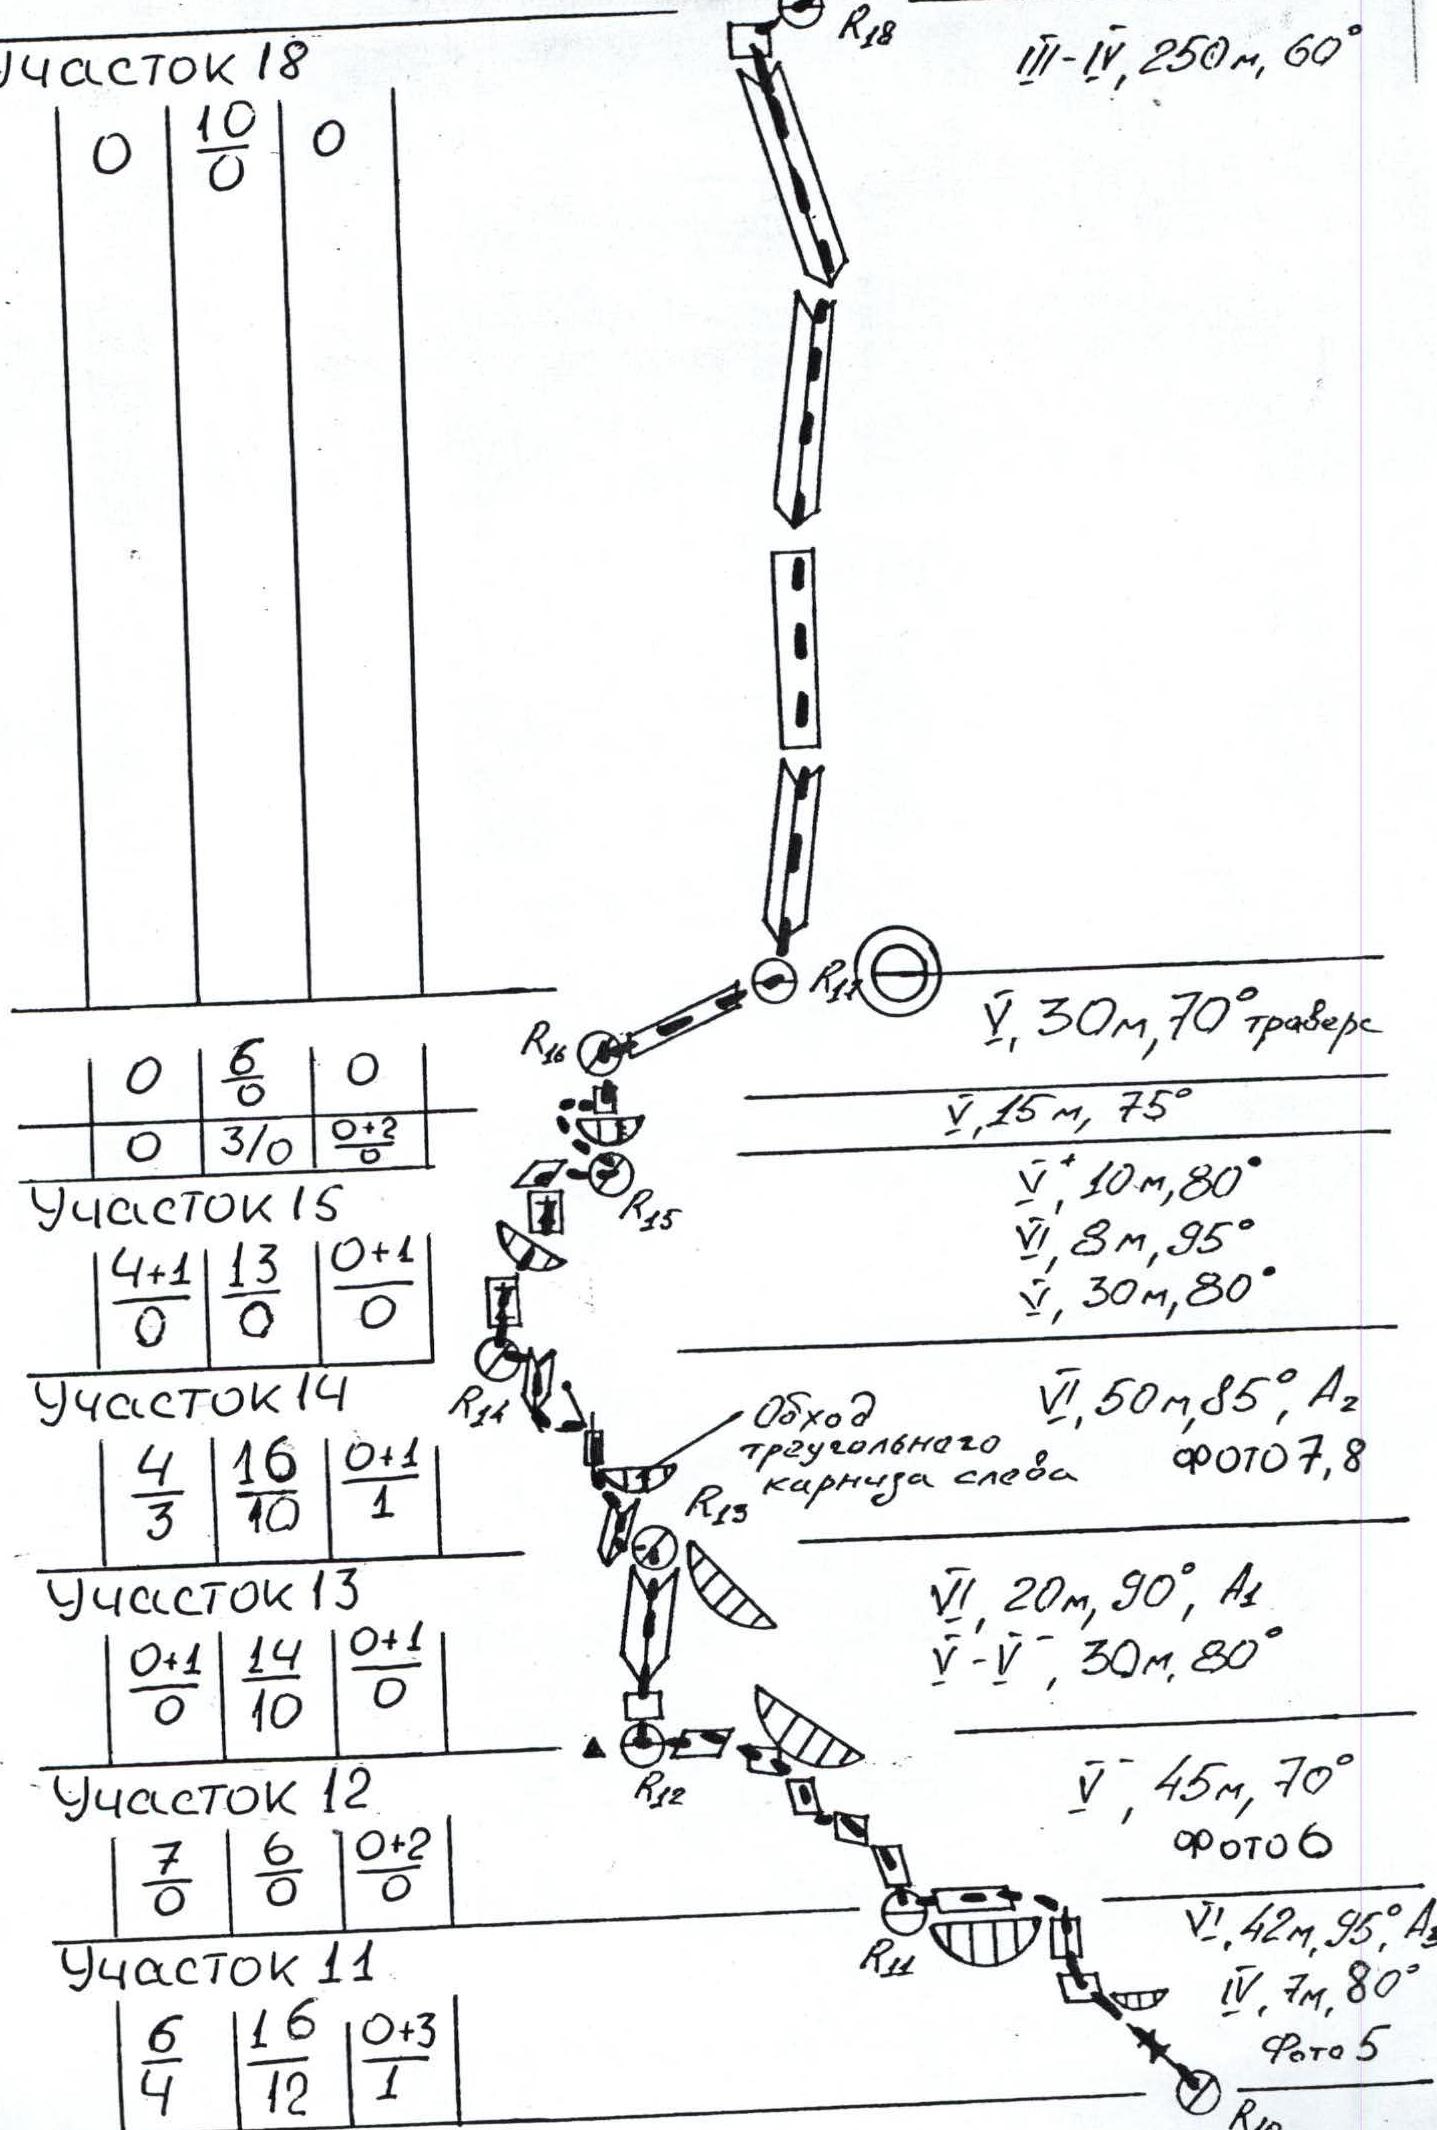
R12–R13
To the right of the bivouac via an inside corner, climbing, rocks of V category (5C–6A), protection — hexes and cams, 30 m, further:
- straight up, bypassing the cornice to the left (approximately A1),
- or bypassing it to the right, climbing via rocks of VI category (6C).
In the second variant, many live blocks. Bivouac: 1 bolt + hook.
R13–R14
Straight up from the bivouac via an inside corner under a black triangular cornice, about 20 m, VI category, A2 (6B+).
Bypass the triangular cornice to the left, 10 m, A2–A3.
Further up via an overgrown, blind crack to a bolt — A3, 15–20 m.
From the bolt, a pendulum leftwards to a neighboring crack, upwards via it to the bivouac. Bivouac is approximately 3 m above the pendulum bolt, loop on a wedged block.
R14–R15
From the bivouac upwards and rightwards, through a bend, about 25 m, 85°, VI category. Rocks are complex but with rich relief, partially wet, at the end of the section we arrive at a wet corner, under an overhang.
- About 10 m through the overhang, 95°
- Further, again rightwards upwards, exit onto the left edge of a wet slab (about 60–70°)
- Bivouac is several meters to the right and above on this same slab
Due to running water, climbing this slab proved practically impossible, and we had to bypass about 10–12 m via a cornice, challenging A3. Bivouac — hook + bolt.
R15–R16
Slightly left of the bivouac, straight up through a cornice, 15 m, V–VI category, two bolts.
End of the wall
R16–R17
Rightwards via a traverse along "ram's foreheads" for the entire length of the rope, exit onto the "gardens" — many ledges, blocks, simple rocks. About 30 m, V category, further — III category.
R17–R18
Further via strongly destroyed simple rocks leftwards upwards, in the direction of the 5A route thread. About 250 m to the ridge.
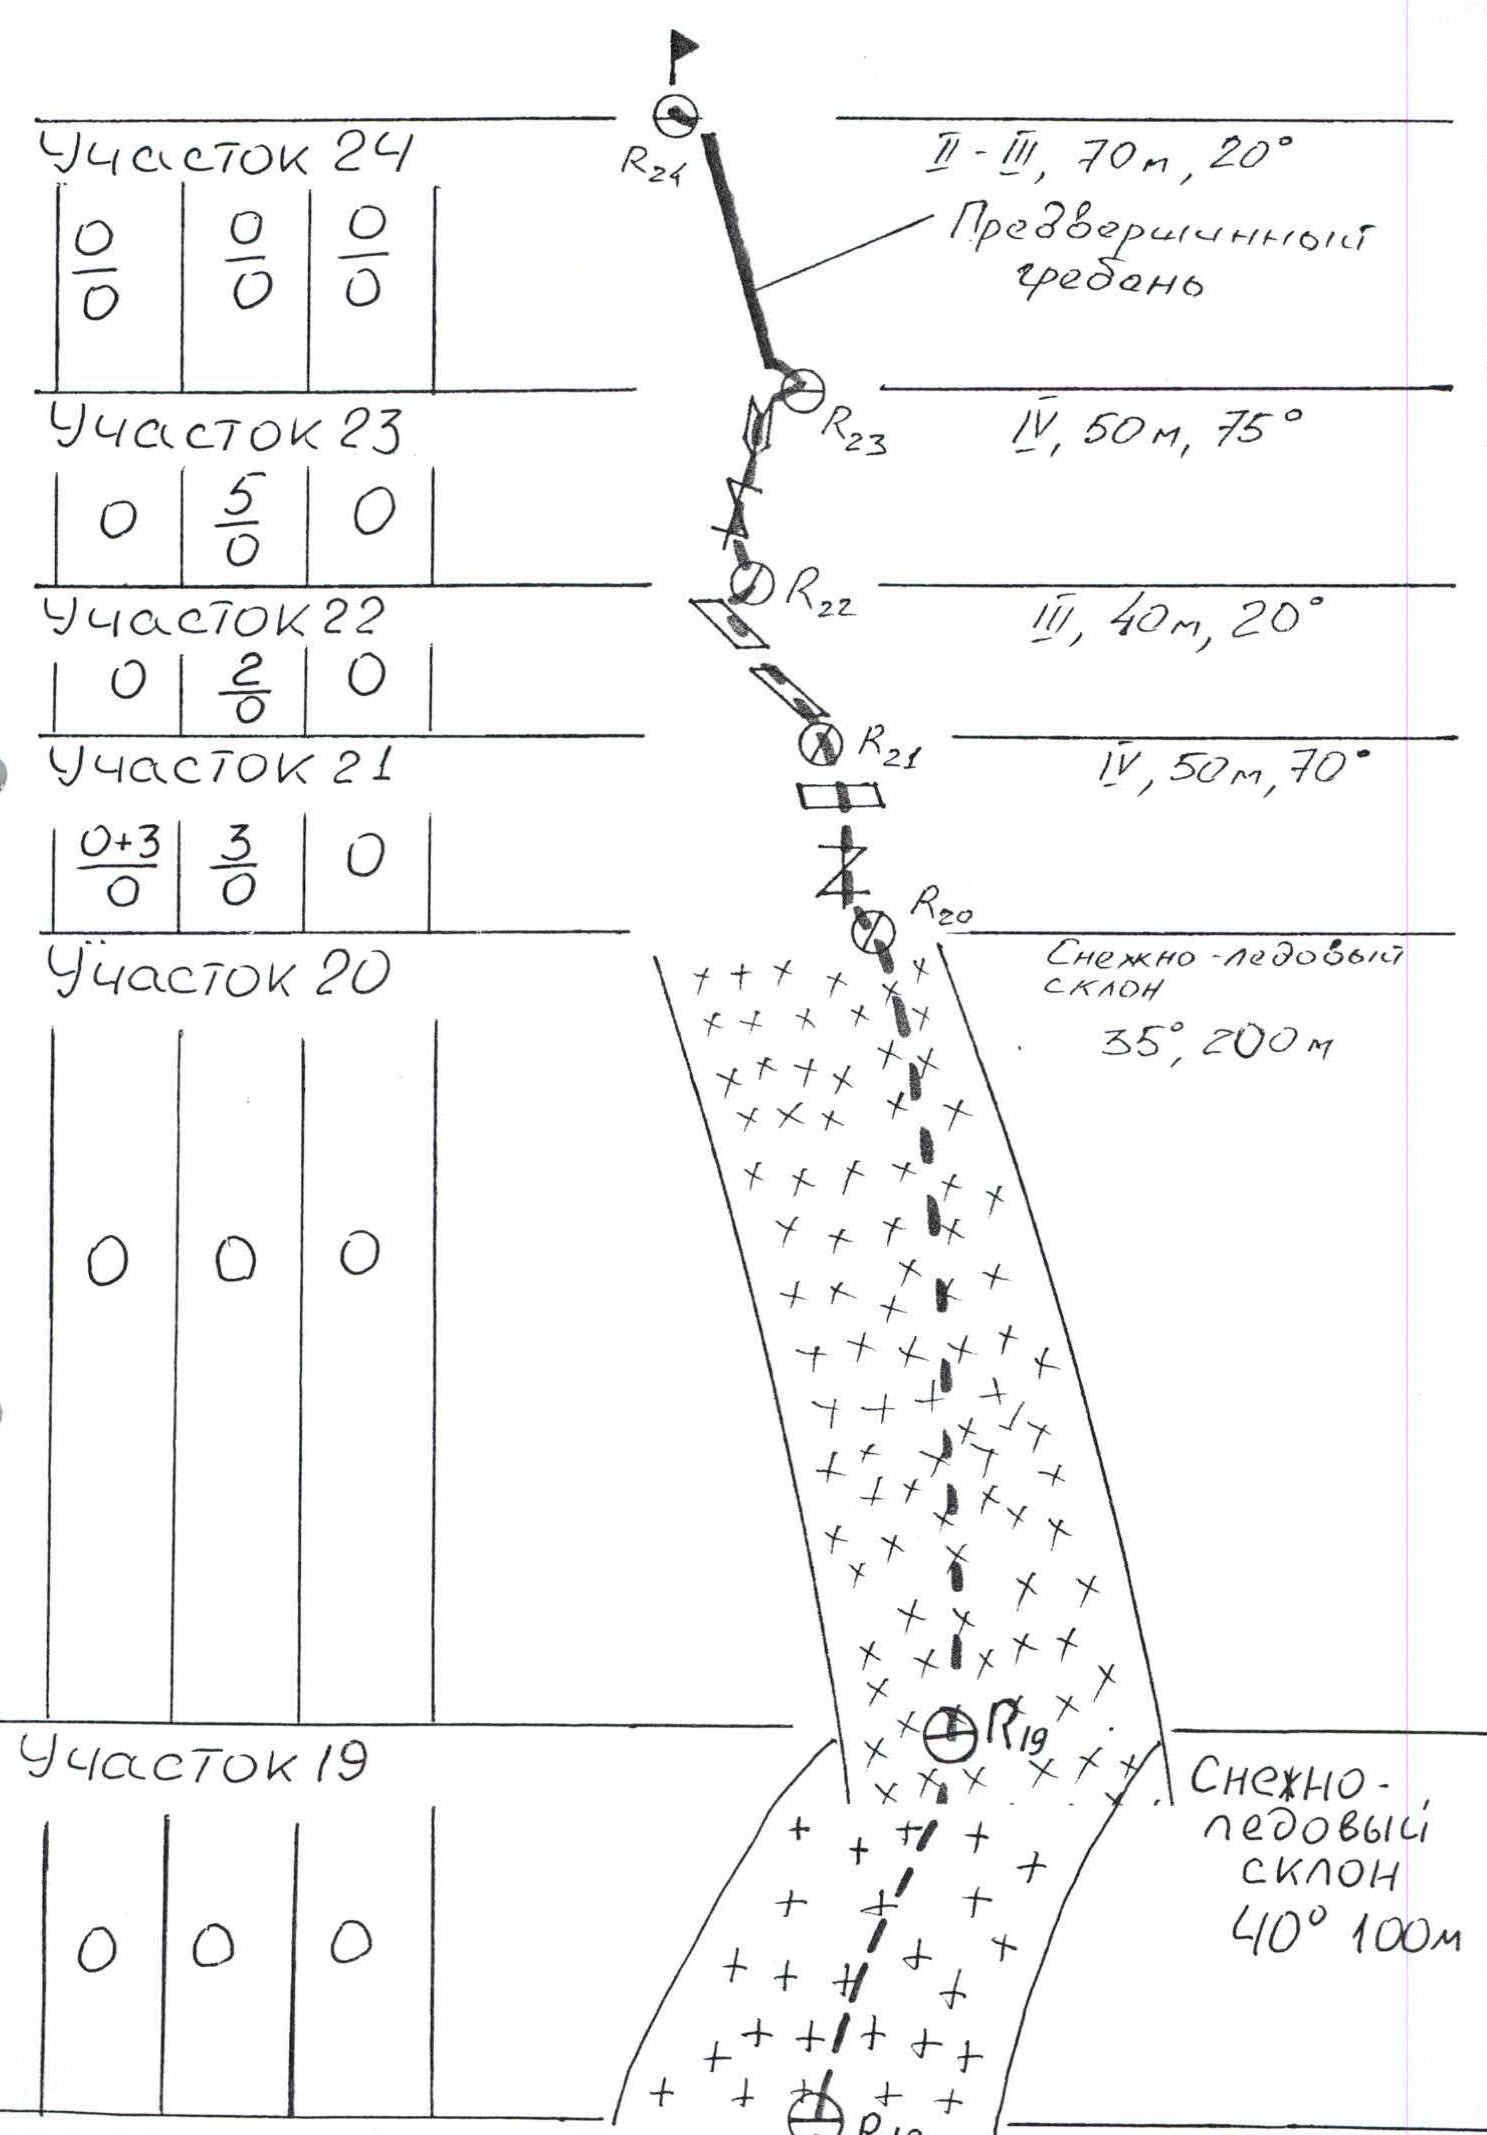
R18–R19
- From the ridge, via a snow-ice slope with rock outcrops, ascend to a saddle under the summit tower — 100 m.
R19–R20
- From the saddle upwards via a snow-ice slope towards the tower, bypassing the first rock outcrop to the left clockwise — 200 m.
R20–R21
From the ridge between the first rock outcrop and the summit tower — upwards (slightly leftwards), via несложными скалами с богатым рельефом — IV category. Bivouac — several hooks with a loop on a large overhanging block.
R21–R22
From the bivouac, traverse via ledges leftwards and approach under an implicit couloir — to the right along the way. About 40–50 m, III category.
R22–R23
Upwards from the ledges via несложными скалами (approximately IV category), 50 m to the summit ridge.
R23–R24
Leftwards upwards via a simple ridge, approximately 80 m to the summit. Rocks are II–III category.
Technical photo of the route
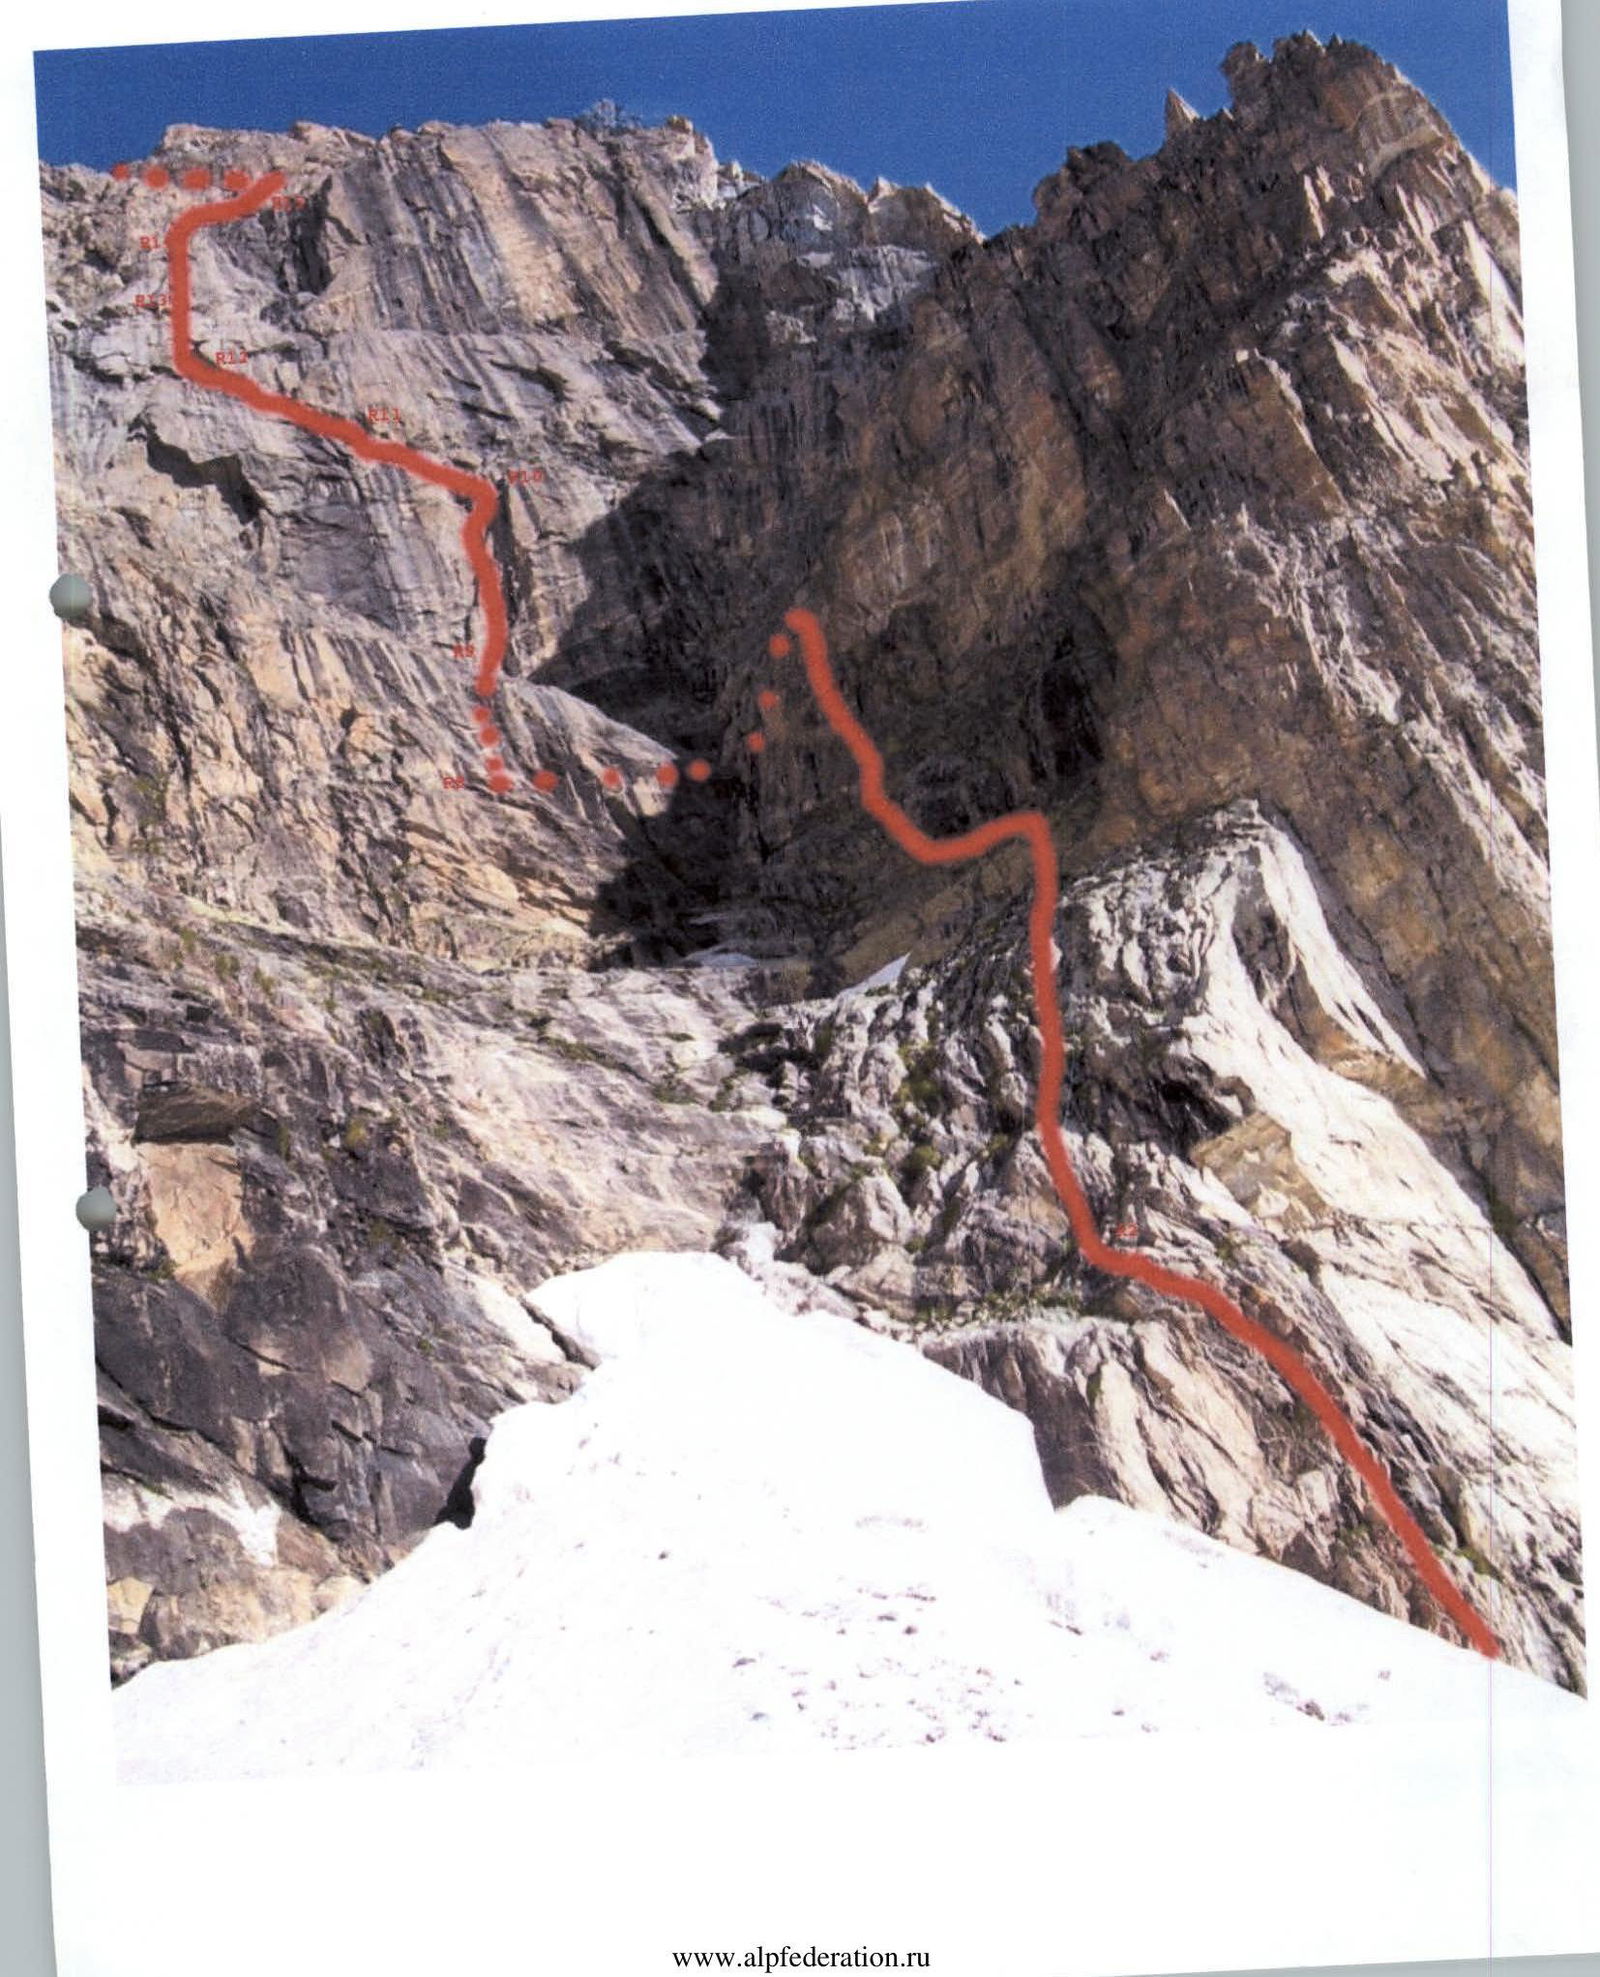
Photo illustration of the report

Photo 1. Section R1–R2.
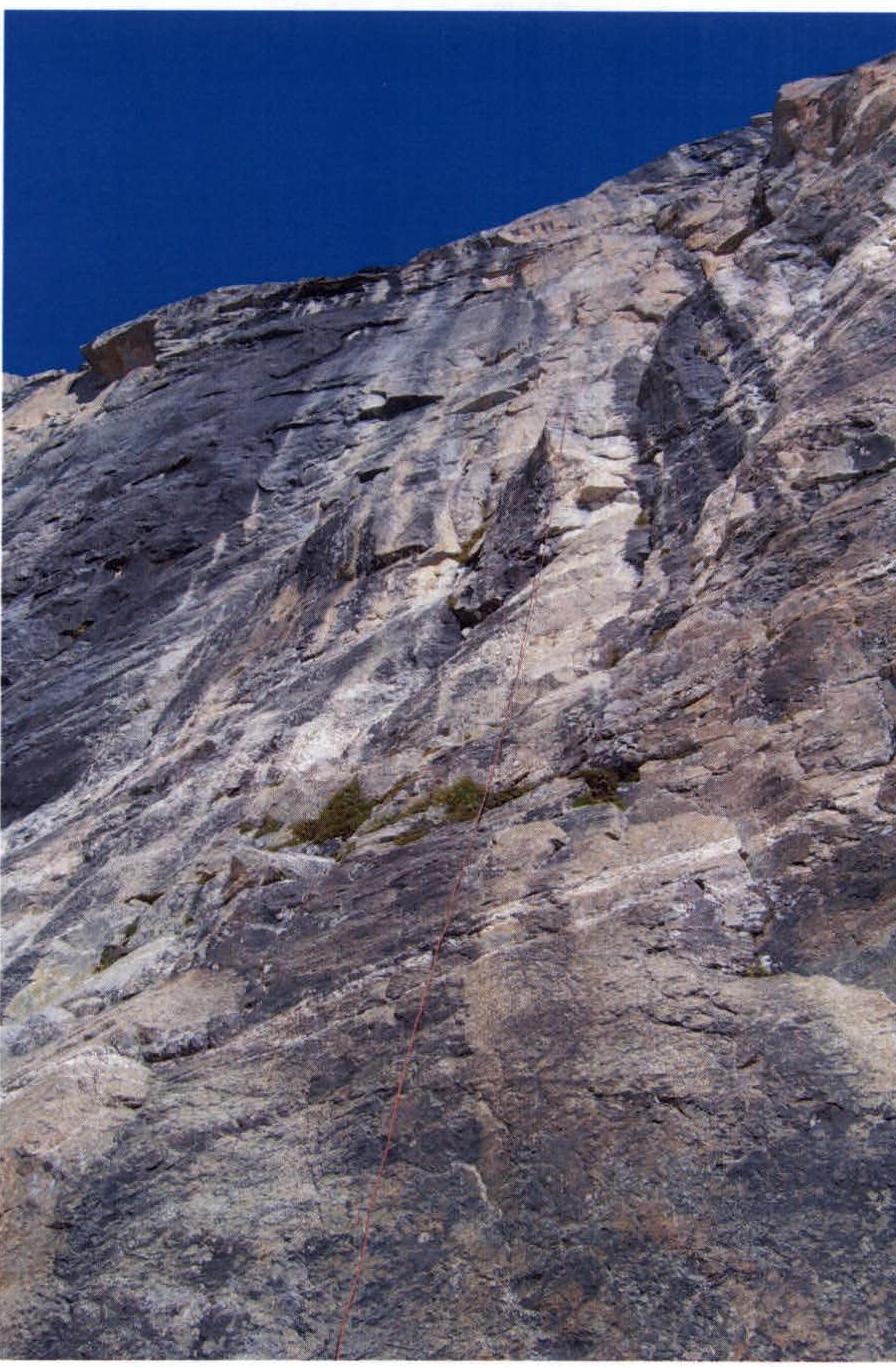
Photo 3. Section R8–R9.
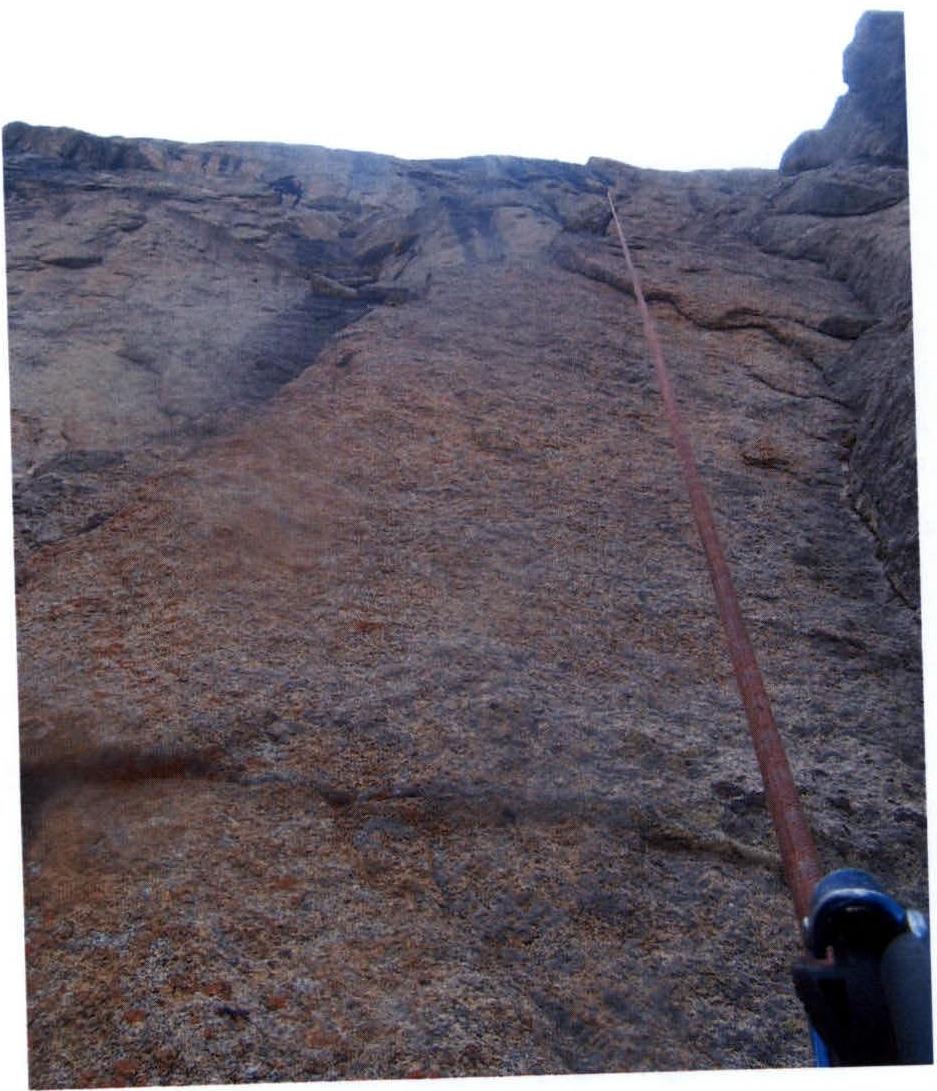
Photo 4. Section R9–R10. A person is visible at the top on section R10–R11.
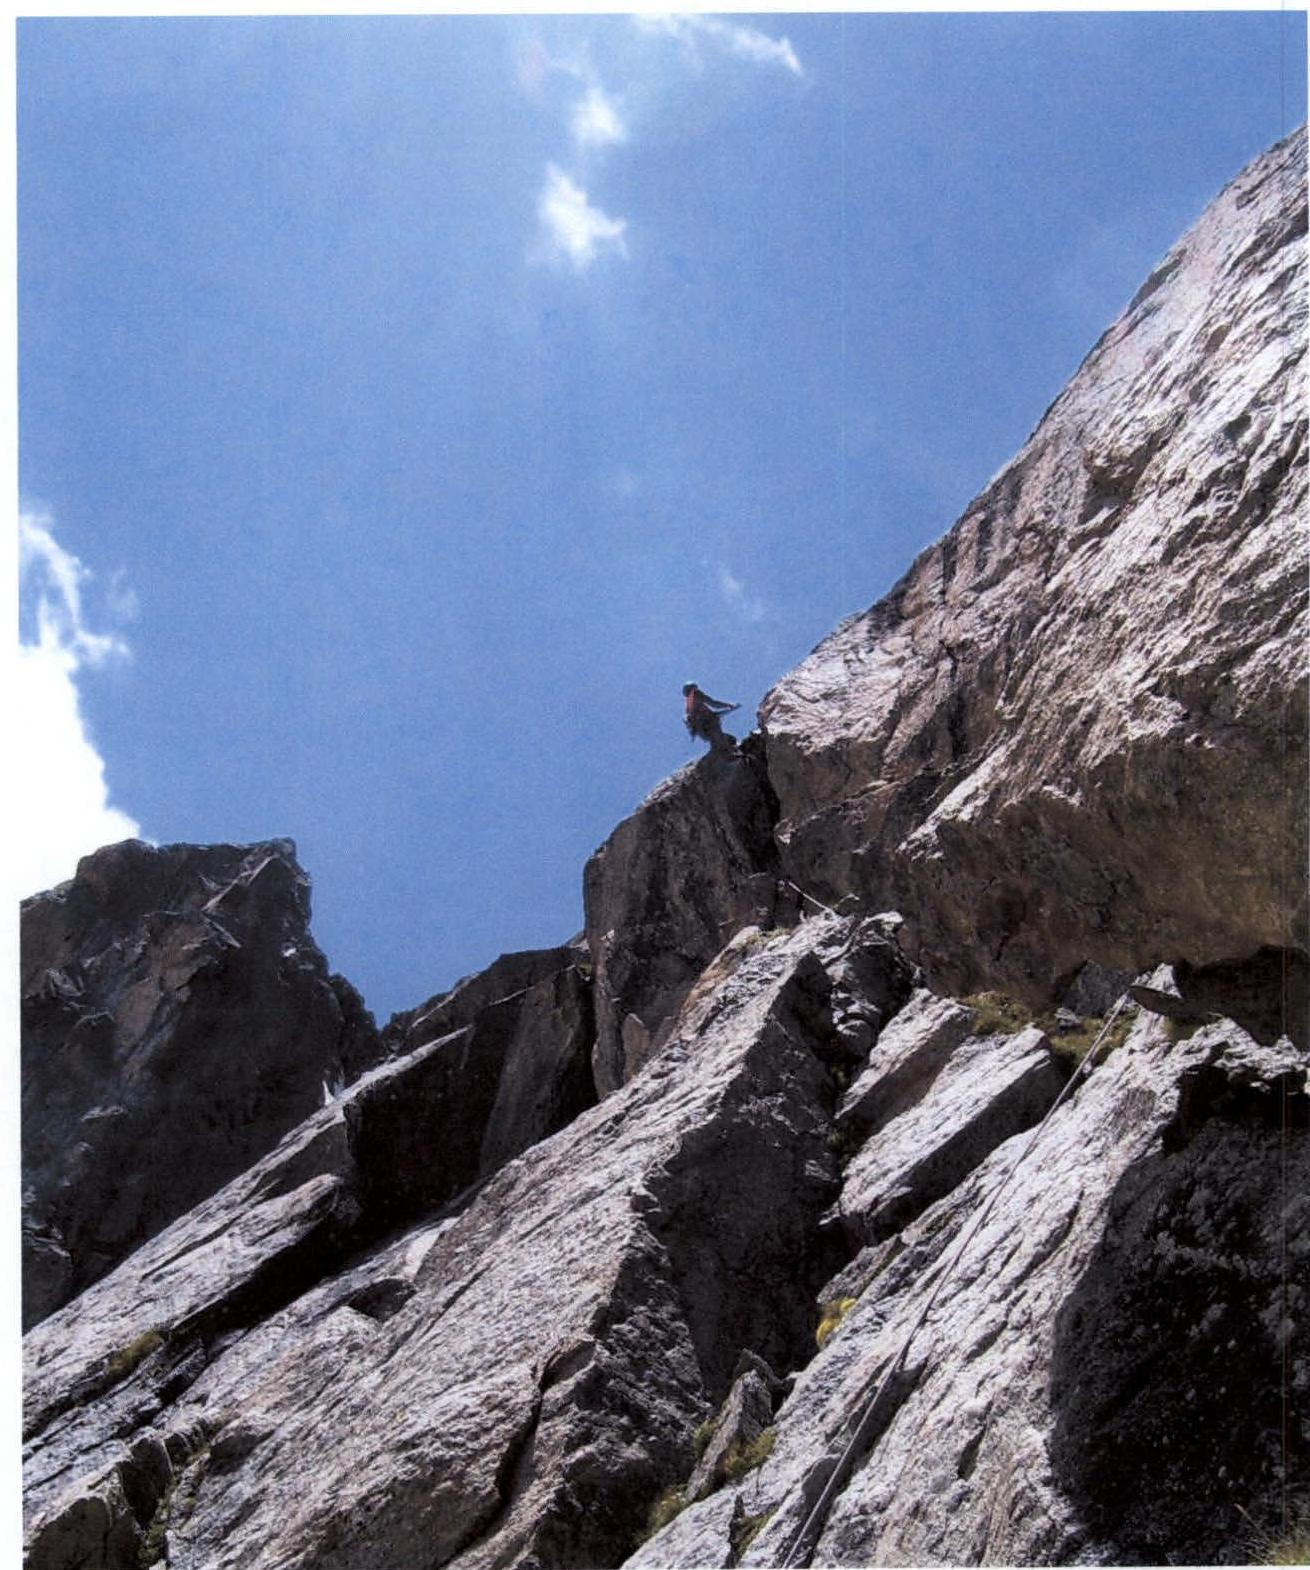
Photo 5. Section R10–R11.
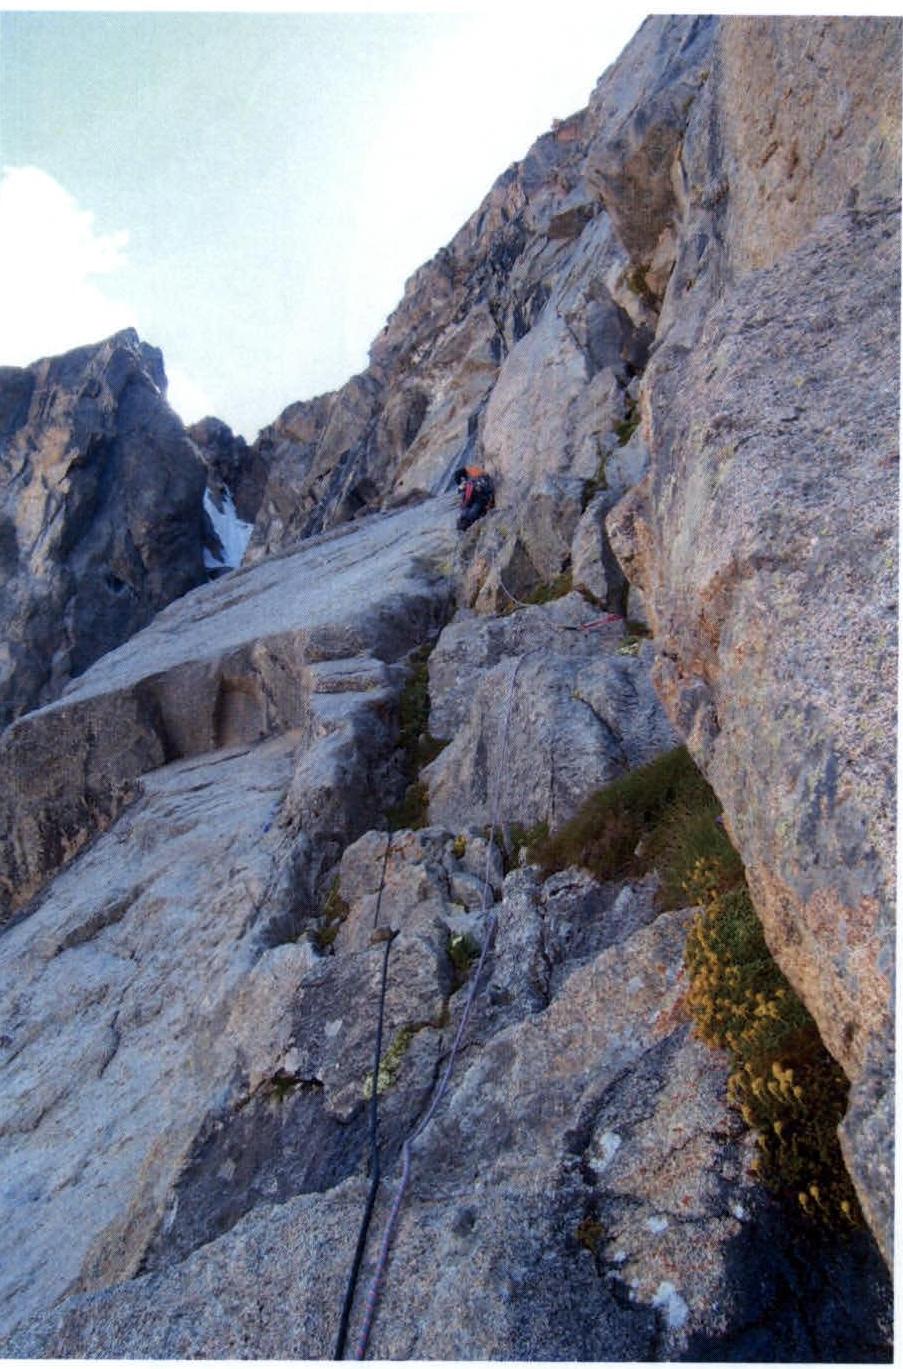
Photo 6. Section R11–R12.
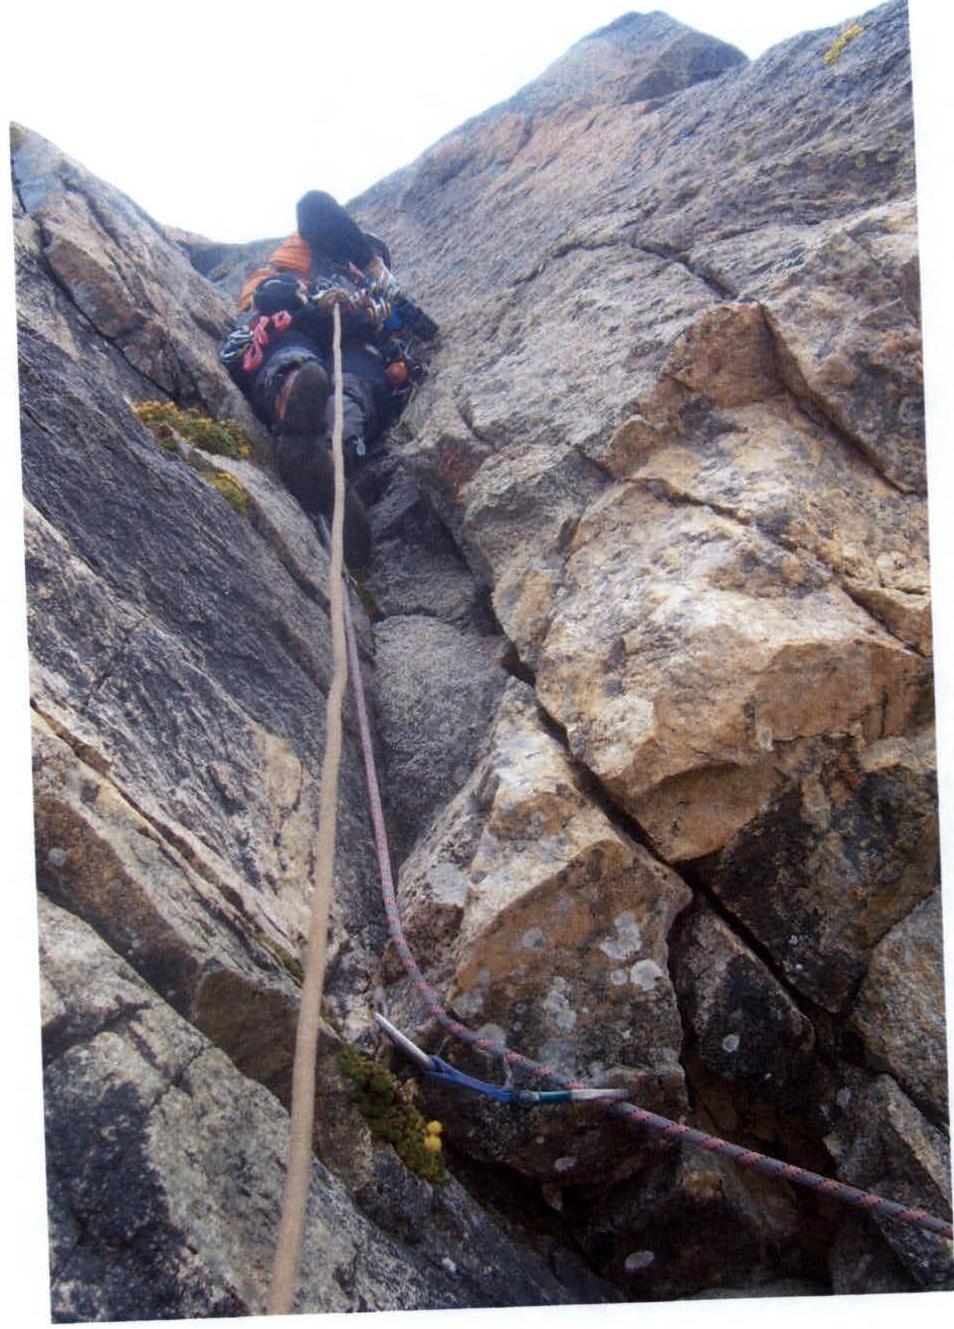
Photo 7. Section R13–R14. Passage of the inside corner.