Ascent Passport Terskolak (NW) 2B, via S slope and W ridge
Table of Contents
- APPROACH
- ASCENT — start
- ASCENT — glacier
- ASCENT — gendarme
- ASCENT — wall
- DESCENT
- ROUTE SECTIONS TABLE
- APPENDIX 1
- APPENDIX 2
Ascent Passport (August 8, 2020)
- Region: CAUCASUS
- Area: 2.10. Dagestan Mountains (from Shaviklde peak to Bazardyuzyu peak)
- Peak: Terskolak (NW)
- Height: 3790 (3810 by GPS)
- Route: via S slope and W ridge
- Category: 2B
- Route type: combined
Elevation gain: 560 m. Route length: 1000 m + 900 m.
- BL "Rigel" → Glacier start (1000 m)
- Glacier start → Summit (900 m)
- Pitons used on the route:
- Cams: 10
- Ice screws: 7
- Ascent duration: 12 h 30 min
- Departure from BL (overnight at "Rigel"): 5:30
- Start of ascent: 6:50
- Reach summit: 12:30
- Return to BL (overnight at "Rigel"): 18:00
- Year: 2020
- Leader: Egorov Sergey (1st category) Team members:
- Podolsky Alexey (badge)
- Riterman Vadim (3rd category)
- Report responsible: Riterman Vadim, valankor@gmail.com
APPROACH
Approach from Terskol town. From the mosque, follow the trail leading to the Terskol gorge (natural park). After the ticket sale point, there's a fork with signs:
- Left — "Deviichii Kosi" waterfall
- Right — "Muzhskie Slezy" waterfall
Turn right towards "Muzhskie Slezy" and follow the well-trodden path along the river. "Rigel" overnight sites are located in the upper part of the gorge, below the glacier.
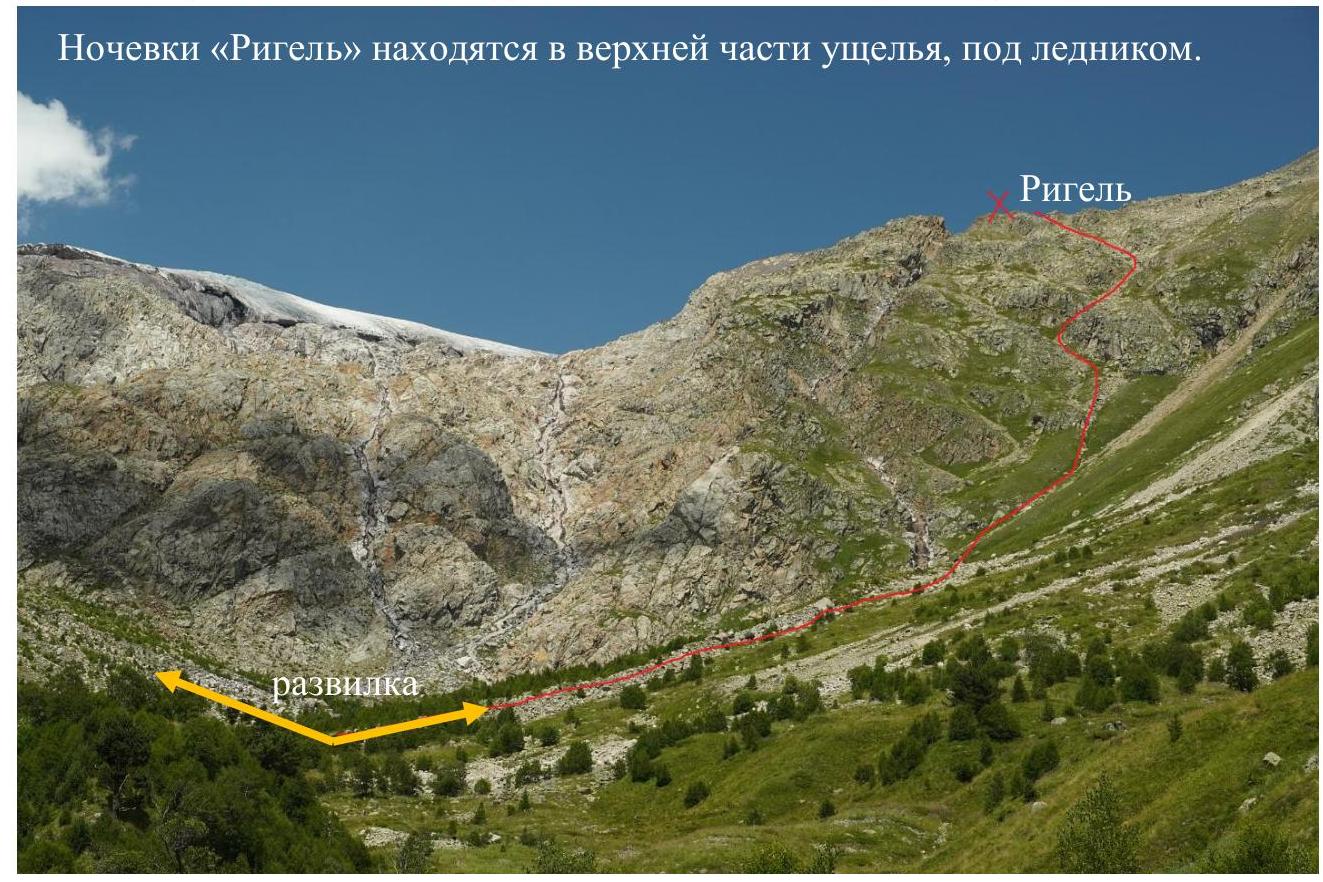
Approach takes 6–8 hours depending on... "Rigel" BL elevation: 3250 m.
FORK
When the "Muzhskie Slezy" waterfall is fully visible on the left, look for a cairn on the right side of the trail, followed by a fork (100 m ahead), and turn right.
ASCENT — start
The route starts east of "Rigel", from under the glacier, about 1 km away. Time: 1–1.5 hours depending on...
Fig. 1. View from "Rigel" BL towards Terskolak (NW) peak.
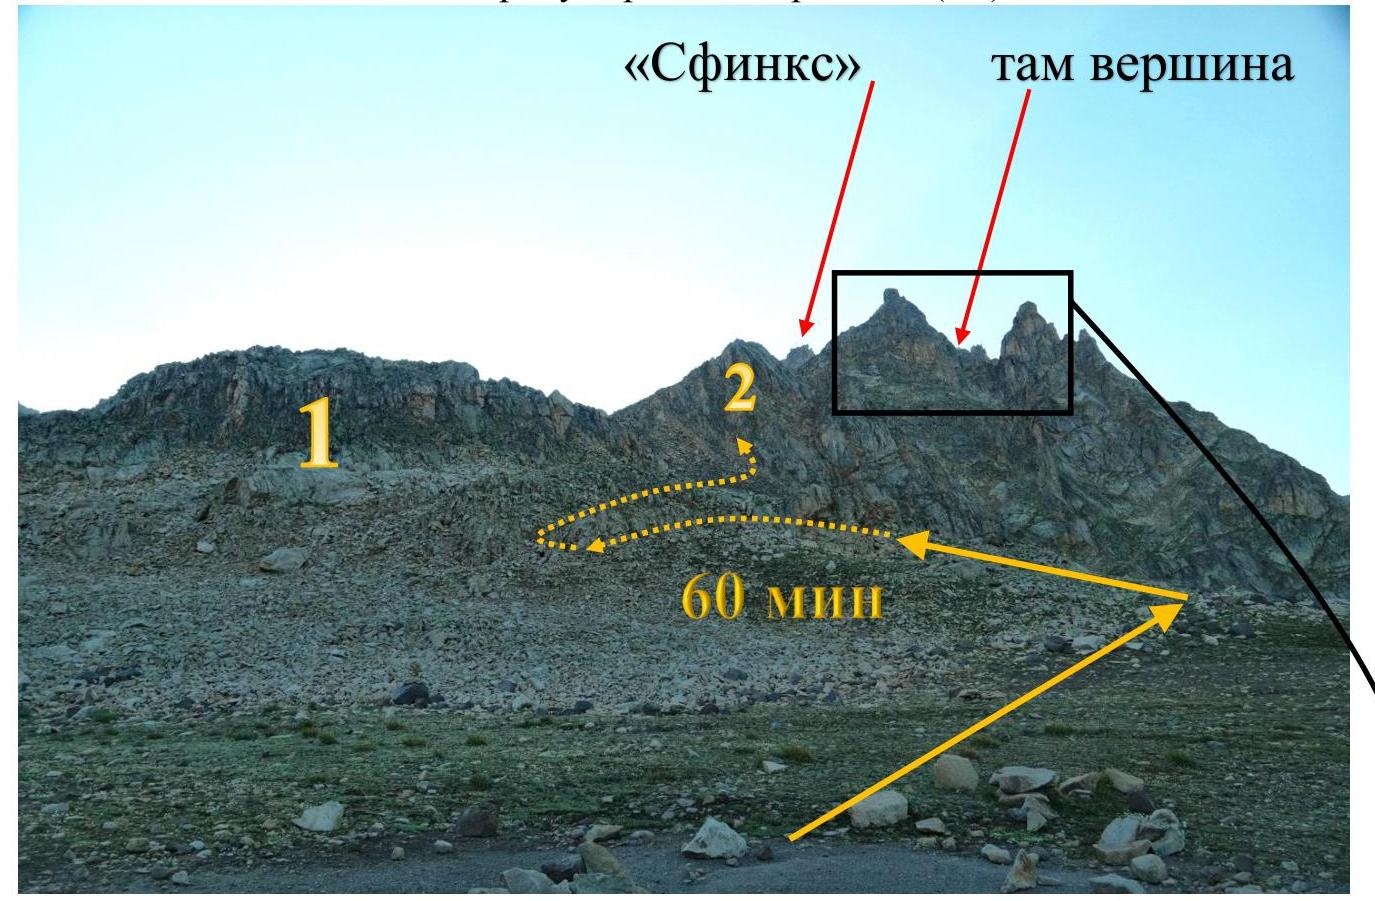
To reach the glacier and start the ascent:
- Bypass rocks "1" on the right (can be done on the left, but right is more convenient)
- Approach the ridge of rocks "2"
- Bypass them on the left, moving along the slope of ridge "2"
The bypass trail is well-marked with cairns.
ASCENT — glacier
After bypassing rocks "1" and reaching the slope of ridge "2", the glacier becomes visible. Plan to depart from BL early enough to reach the glacier at dawn and start crossing it as early as possible. The glacier is prone to rockfall:
- Early morning, before sunlight, rocks fall approximately every hour.
- With sunlight, rocks fall every 5–10 minutes from the upper part of the glacier.
- Mostly on the left and right sides of the glacier (along the gullies where ice meets rock).
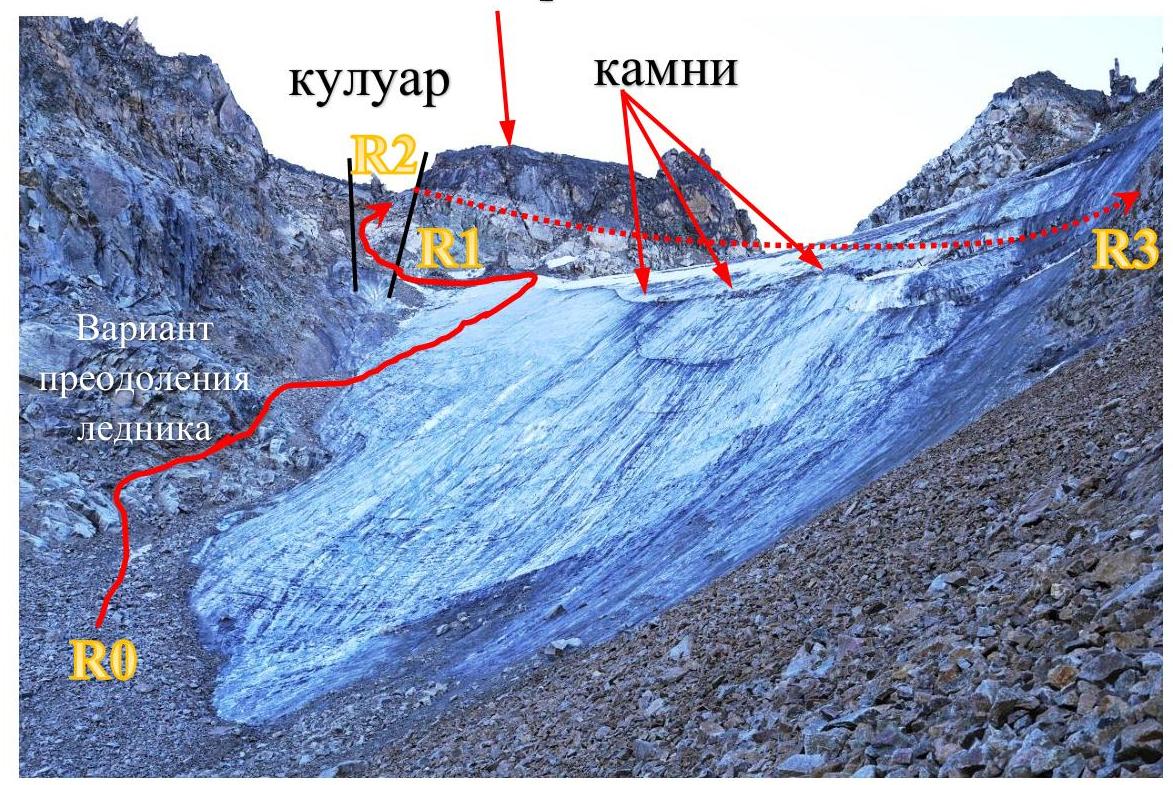
Fig. 2.
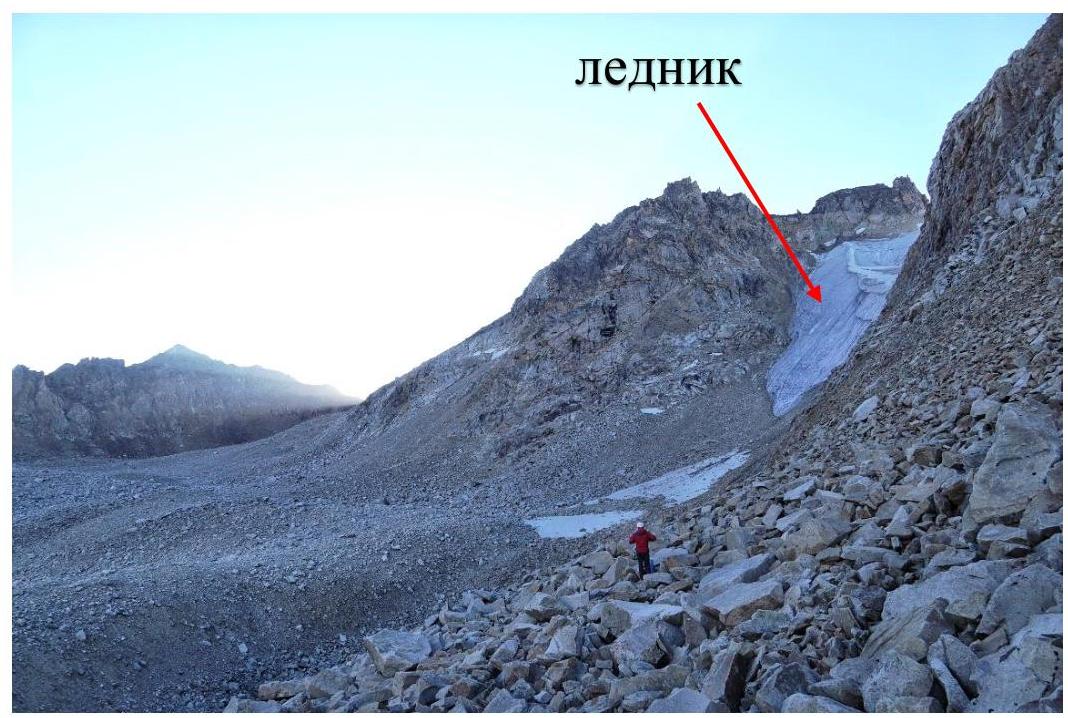
Most likely, crossing the glacier near the center is the safest. This depends on the season. In summer, rocks lie on the center of the glacier and can fall.
An alternative is to bypass the lower part of the glacier on the left, under the cover of rocks, then:
- two ropes on the glacier to its ridge
- traverse left into the couloir
Climb the couloir to reach the gendarme. Bypass the gendarme on the left.
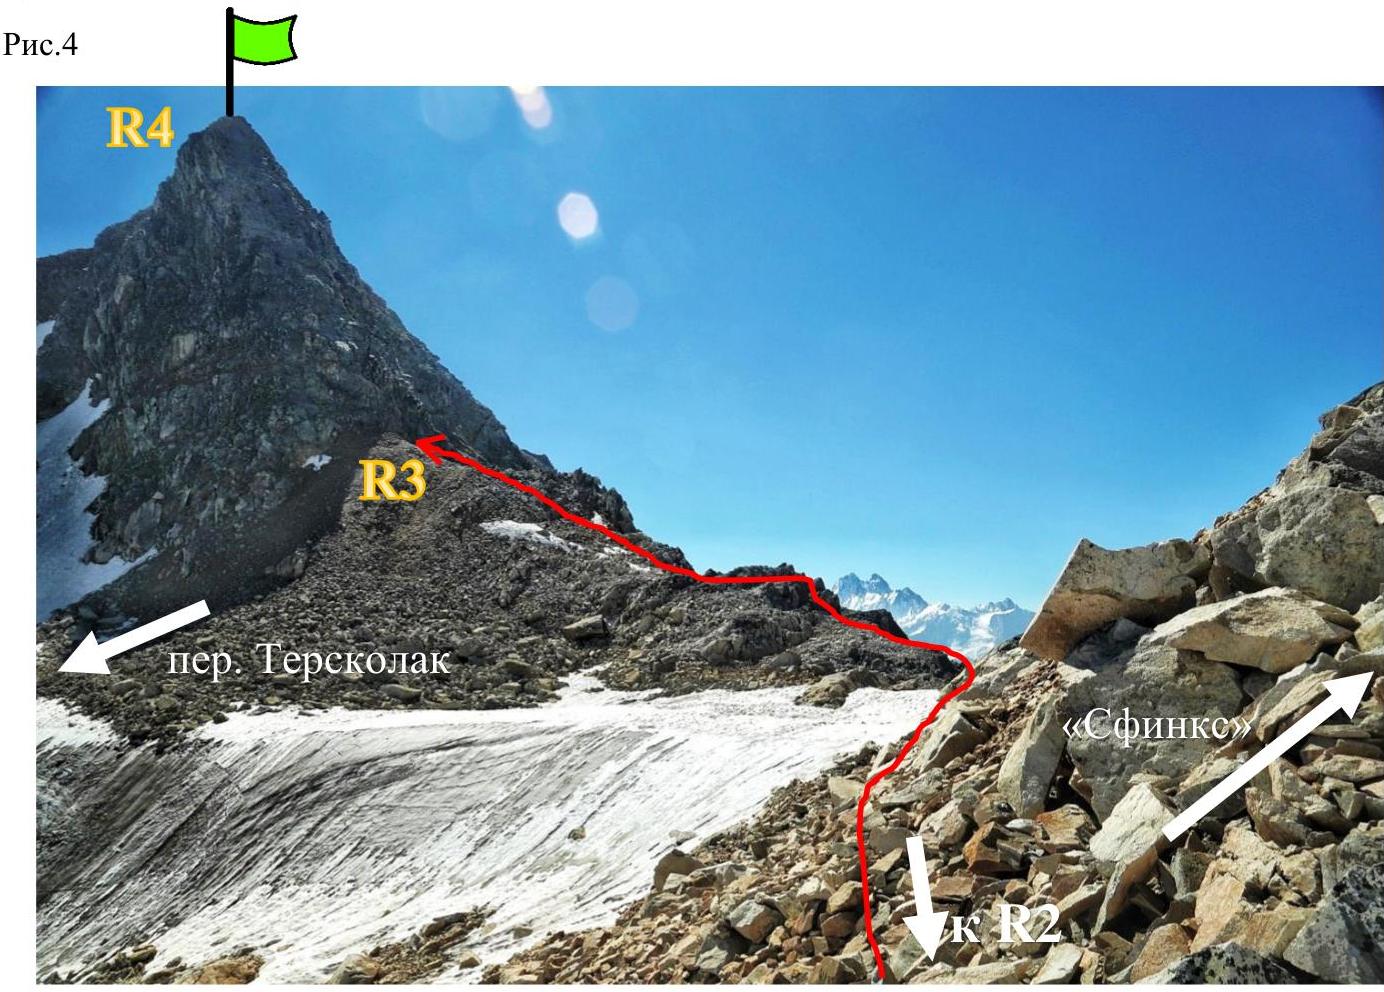
ASCENT — gendarme
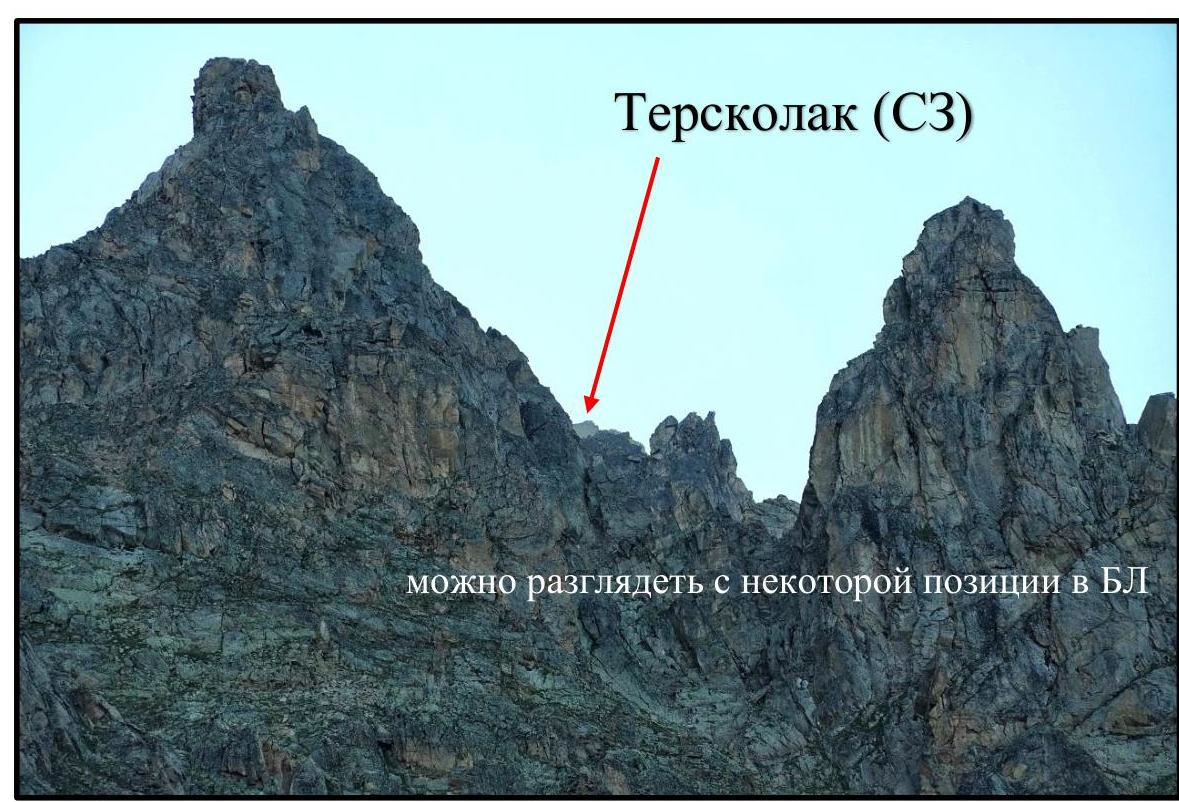
When bypassing the gendarme on the left, move towards the pre-summit wall. The "Sphinx" remains on the right above the group. From the summit and Terskolak pass, this distinctive group of rocks will be reminiscent of a sphinx.
Fig. 4.
ASCENT — wall
Fig. 5.
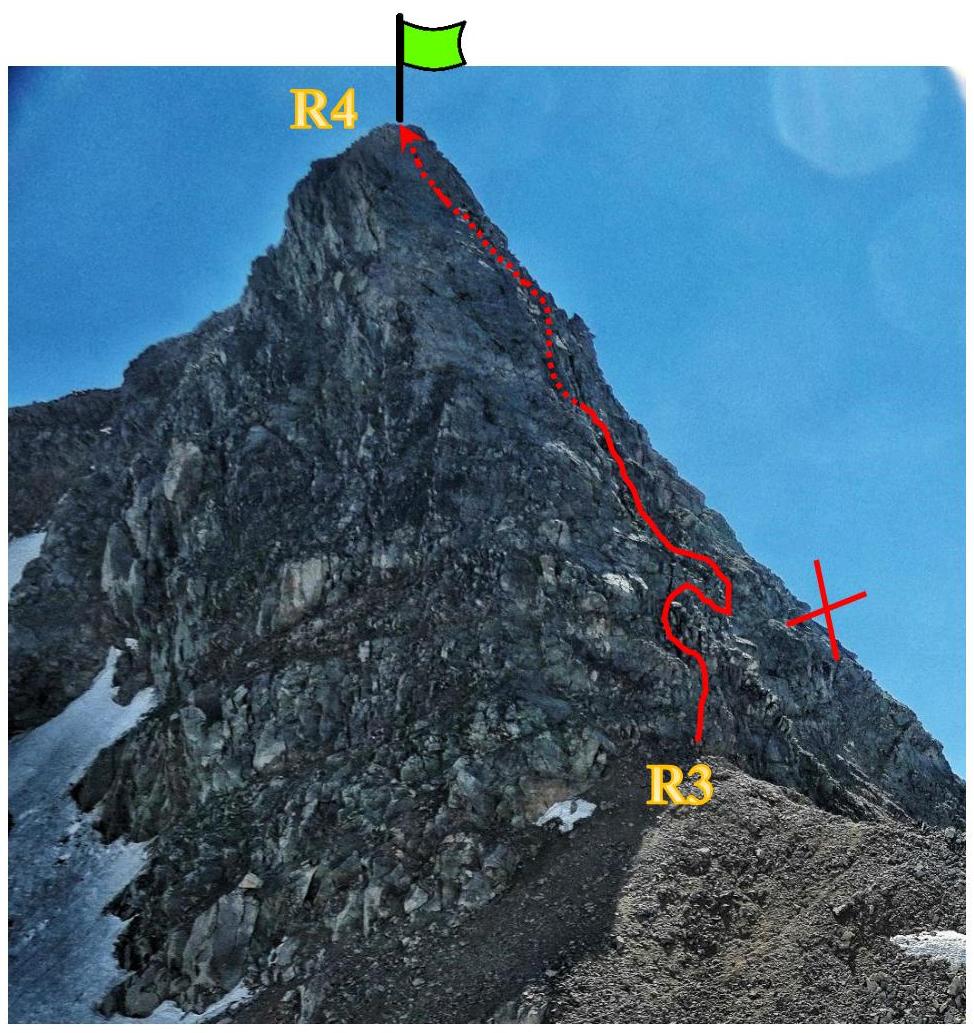
To reach the summit, overcome three ropes on the pre-summit wall of the western ridge. Climbing difficulty: 2–3. Use 3–4 cams per rope. Avoid using the second ridge (to the right of the route), as it's outside the route.
These two ridges are separated by a small couloir, which the group did not cross, staying on the western ridge.
DESCENT
Fig. 6.
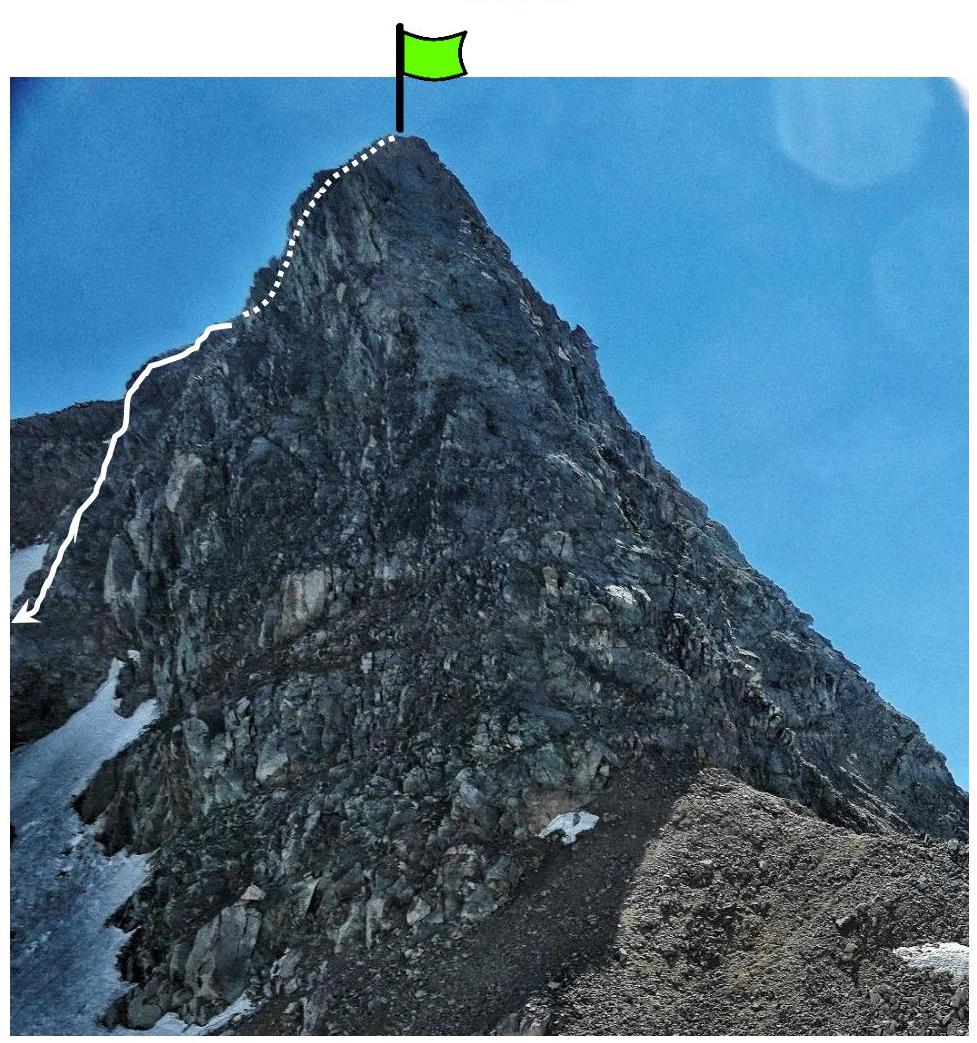
Descend north towards Terskolak pass. Can be done by rappel (risk of dropping rocks with the rope) or on foot along the ridge (risk of dropping rocks on steep scree slopes, proceed one by one).
Fig. 7. View of the summit from Terskolak pass.
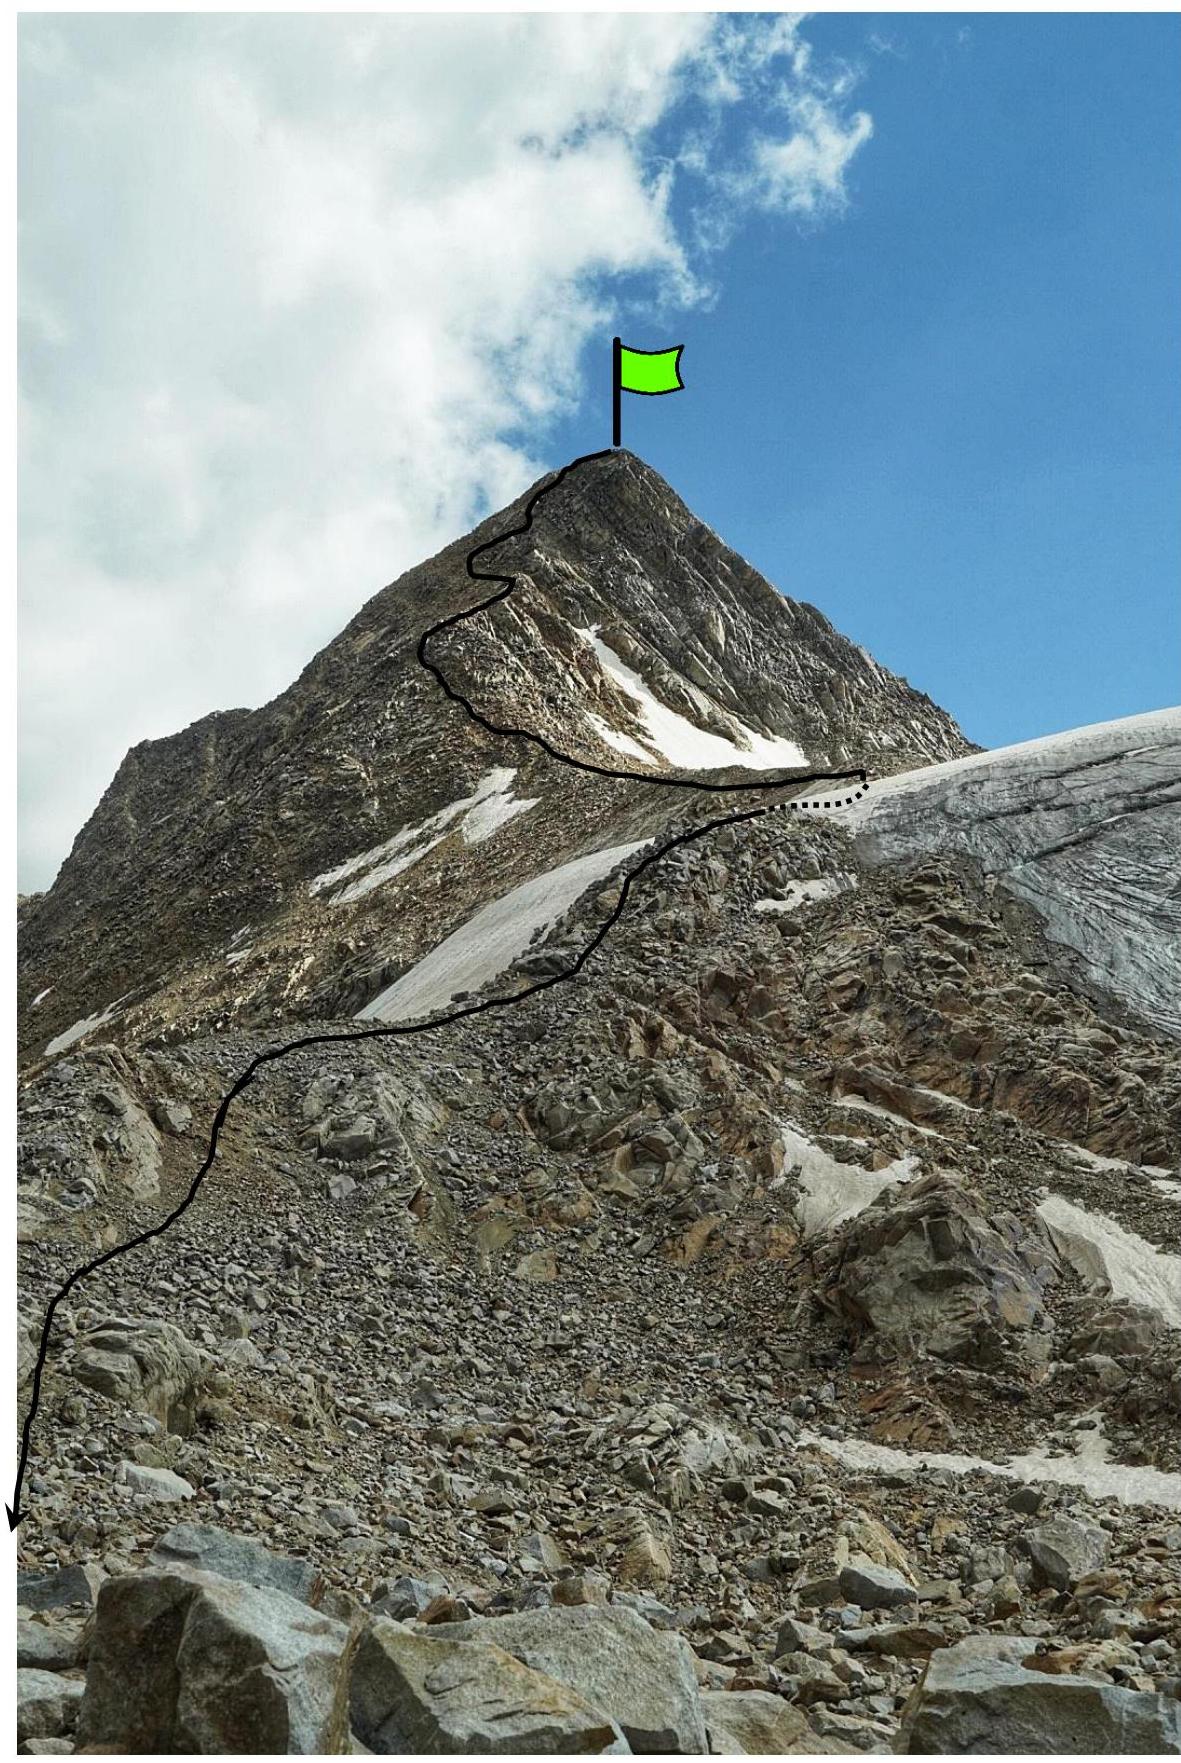
Fig. 8. View from Terskolak pass towards continuing descent to BL.
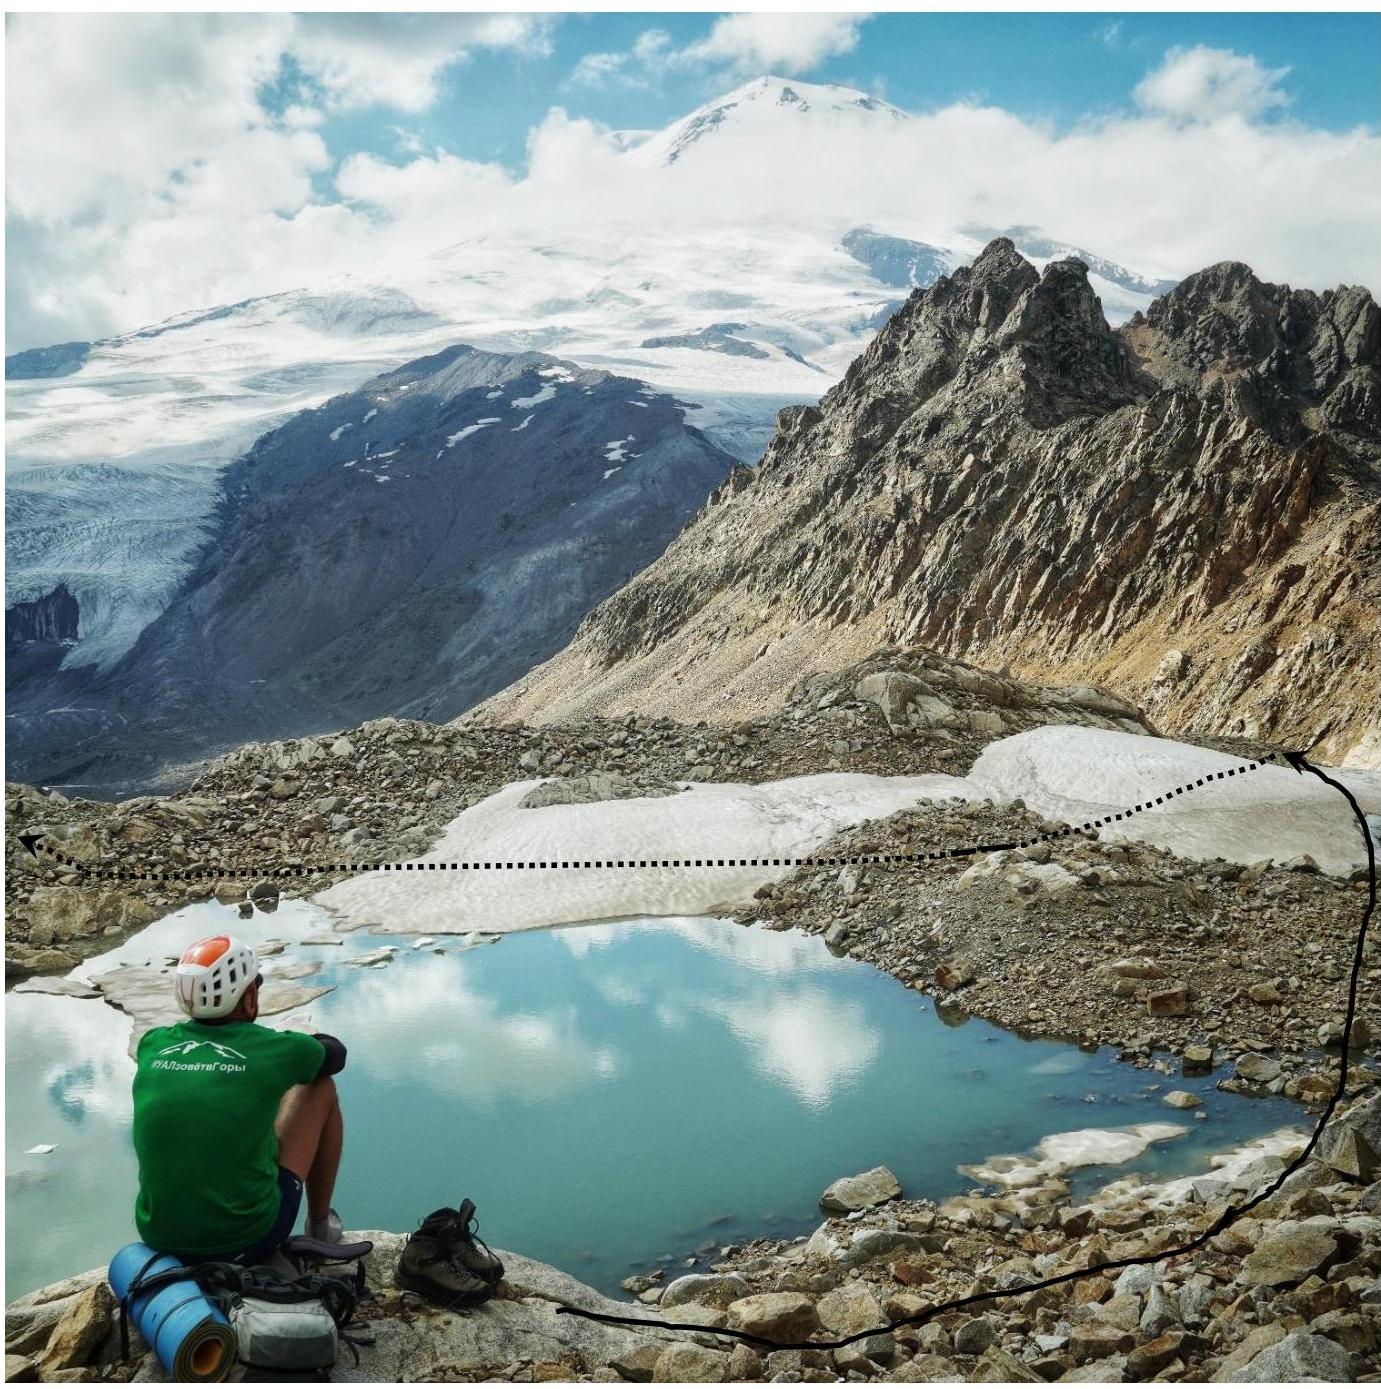
From the pass, bypass the lake on the right and descend into the "stone valley", cross it towards BL. Route cairns are set along the valley. After the valley, exit onto the 1–2 trail to the glacier.
ROUTE SECTIONS TABLE
| Section | Length | Difficulty | Pitons | Cams (Friends) | Ice screws |
|---|---|---|---|---|---|
| R3–R4 | 200 m | II, II+ 40–70°. Three ropes on the wall, choosing a convenient climbing route, good spots for protection and belays, few loose rocks, not falling, 5 m on the ridge to the summit cairn | --- | 3+4+3 | --- |
| R2–R3 | 400 m | 0–15°. Rocky scree, stony slope | --- | --- | --- |
| R1–R2 | 80 m | 30–40°. Scree couloir | --- | --- | --- |
| R0–R1 | 200 m | 45°. Glacier, rockfall hazard | --- | --- | 7 |
| BL–R0 | 1 km | 0–15°. Along the trail, stony slope | --- | --- | --- |
APPENDIX 1
- Couloir: Cornice, overhang
- Wall: Smooth rock, boulders
- Ledge: Cave
- Internal corner: Complex rock formation
- External corner: Ice, snow
- Ridge: Scree
- Chimney: Grass
- Plug: Trees, bushes
- Summit: Crack with artificial anchors
- Cairn: Crack with climbing holds
- Counterfort: Obstacles!
- Convenient belay: Crack in the glacier
- Uncomfortable belay: Rappel
- Very uncomfortable belay: Pendulum
- Comfortable bivouac: Bolt
- Mediocre bivouac: Piton
- Awful bivouac: Crux
- Route line
- Alternative route
- Invisible section
APPENDIX 2
For sections climbed using free climbing, the following difficulty scale is applied: I, II ±, III ±, IV°, V°, VI°.
- I — easy — basic technique knowledge required. Footing is reliable, various techniques can be used. Maintaining balance while moving doesn't require significant effort. Generally easy.
- II — moderately difficult — requires ice axe for balance, varied footholds and techniques. Moving requires sufficient effort, some knowledge of movement techniques necessary.
- III — difficult — foothold choices not limited, but not all are convenient or reliable. Movement is on feet, hands used for balance and smooth foot transfer.
- IV — very difficult — limited foothold and technique choices. Available options don't provide maneuverability or confidence. Significant effort required for movement and balance.
- V — extremely difficult — few footholds, not all reliable, require careful testing. Path and technique choices require serious consideration; maintaining balance and movement demands significant effort and agility.
- VI — exceptionally difficult — very few footholds, very limited technique choices. Maintaining balance and movement requires agility and strength, up to maximum effort. In addition to the above, other countries' classification methods can be applied.
For climbing with artificial aids (hanging ladders, loops, platforms on pitons), difficulty is assessed on a 4-point scale: A1, A2, A3, A4.
- A1 — single pitons; terrain is simple and reliable; (safe artificial anchors: all points are reliable)
- A2 — series of artificial anchors; terrain is simple and reliable (not all protection points are reliable, risk of injury upon fall)
- A3 — large series of artificial anchors; terrain is complex; overcoming cornices and overhangs; (50% of protection points are unreliable, significant risk of injury upon fall)
- A4 — large series of artificial anchors; terrain is complex, unreliable; overcoming large cornices over 1 m (about 80% of protection points are unreliable, risk of life-threatening injury upon fall)